Two little projects on my workbench: the railcar kitbash and a luggage cart.
I've only gotten this far, but it's a start.
Then I discovered an article written by John Allen on how to build a luggage cart, and I decided to modify his design a little and try my hand at it.
Here's his design.
Here's my progress so far on a card model version. I've added an extra rack to the back, per some prototypes, along with lettering on the side. Allen's wheels were acetate with the spokes drawn on; I decided to cut the spokes out, add rims and wrap a paper band around the outside.
Showing posts with label HO scale. Show all posts
Tuesday, December 4, 2018
Sunday, November 25, 2018
Clever Models Gateman Tower, Test Fitting Sub-Assemblies
I am 5/8ths done with the upper tower walls and windows.
Here's what I have so far, roughly balanced together in order to see if I've screwed anything up.
My original plan was to light the inside, but at this point, that's too much of a hassle. I did sandwich a layer of black cardstock between the outer and inner surfaces, so if I do light it later, the light won't shine through the walls.
Friday, November 23, 2018
Clever Lever
I'm finally getting around to finishing my build of Clever Models' Octagonal Gateman's Tower.
I've had the stairs done and sitting around for a long time now; I guess it's time to finish the durn fool thing.
The project of the last couple days was making the lever which operates the gates. After Googling around, I found the following image showing the proportions of the lever.
From that, I was able to get my measurements. My first attempt was made from black cardstock, which looked all wrong. Then I took some stiff wire intended for earring and jewelry making, along with the foil cap from a wine bottle, and made this:
I assembled the whole thing with CA glue, and wrapped the top and bottom with a thin strip of the wine foil cap, and added a drop of black acrylic paint to the tips of the levers to resemble the rounded ends of the handles. I think that's about as close as I can get to the prototype, given the supplies I had on hand.
Putting clear windows in this beast at HO scale is very difficult indeed; I'm getting quite a bit of squeezeout from the CA glue, but I've decided it's pretty minor, given the scale, and it looks a bit like cobwebs. Cobwebs, yeah, sure, that's the ticket!
I'll probably make the roof removable if I decide I can't see the details through the windows.
I've had the stairs done and sitting around for a long time now; I guess it's time to finish the durn fool thing.
The project of the last couple days was making the lever which operates the gates. After Googling around, I found the following image showing the proportions of the lever.
I zoomed in on just the tower, and in GIMP, I pasted the cropped image below over the Clever PDF, sizing it to get it to match the size of the upper room.
From that, I was able to get my measurements. My first attempt was made from black cardstock, which looked all wrong. Then I took some stiff wire intended for earring and jewelry making, along with the foil cap from a wine bottle, and made this:
I assembled the whole thing with CA glue, and wrapped the top and bottom with a thin strip of the wine foil cap, and added a drop of black acrylic paint to the tips of the levers to resemble the rounded ends of the handles. I think that's about as close as I can get to the prototype, given the supplies I had on hand.
Putting clear windows in this beast at HO scale is very difficult indeed; I'm getting quite a bit of squeezeout from the CA glue, but I've decided it's pretty minor, given the scale, and it looks a bit like cobwebs. Cobwebs, yeah, sure, that's the ticket!
I'll probably make the roof removable if I decide I can't see the details through the windows.
Saturday, March 19, 2016
Papercraft Chimneys
I got frustrated trying to saw a notch in some plastic HO scale chimneys, so I decided to make my own.
I started with the working drawings from the Great Northern Historical Society's Modelers' Pages (#392, "Section Houses and Facilities.")
I'd already enlarged the image to use as a template for making walls and roofs, so I just scanned my enlargement at 100% as a starting point. I opened The Gimp, and used one of Clever Models' excellent brick textures to make a simple box with a notch on the bottom. I used that scan of the enlargement to get the size and shape of the chimney correct. I inkjet printed the result on matte photo cardstock, along with a partial sheet of just the brick texture. I cut and assembled the chimneys, adding strips of heavy black cardstock to the interior as I folded, to give it a little thickness. I touched up the edges with gouache paint as I went along. I cut two strips from the brick texture -- one strip was three bricks wide, the other, one brick wide -- and I wrapped them around the chimneys near the top.
The first chimney must have taken about 45 minutes to make, and I messed it up badly and threw it out. By the time I'd made three, they all looked uniformly nice and my time dropped to about 15 minutes for each.
Here is one of the chimneys test-fitted to the roof I completed earlier.
I opted to scratch-build these four models for my client rather than buy and assemble four GNHS kits, since it's actually a savings for him -- cutting the pieces myself and assembling them takes only slightly more time than merely assembling a kit. This also means the money I would have spent on the kits -- which are about $25 each -- goes directly in my pocket. Another advantage to me is: I only charge the client for the time spent on the buildings I make for him, and I track my time very carefully, so as I go along, I can make a fifth model on my own time and at my own expense, and sell it to another client later.
I started with the working drawings from the Great Northern Historical Society's Modelers' Pages (#392, "Section Houses and Facilities.")
I'd already enlarged the image to use as a template for making walls and roofs, so I just scanned my enlargement at 100% as a starting point. I opened The Gimp, and used one of Clever Models' excellent brick textures to make a simple box with a notch on the bottom. I used that scan of the enlargement to get the size and shape of the chimney correct. I inkjet printed the result on matte photo cardstock, along with a partial sheet of just the brick texture. I cut and assembled the chimneys, adding strips of heavy black cardstock to the interior as I folded, to give it a little thickness. I touched up the edges with gouache paint as I went along. I cut two strips from the brick texture -- one strip was three bricks wide, the other, one brick wide -- and I wrapped them around the chimneys near the top.
The first chimney must have taken about 45 minutes to make, and I messed it up badly and threw it out. By the time I'd made three, they all looked uniformly nice and my time dropped to about 15 minutes for each.
Here is one of the chimneys test-fitted to the roof I completed earlier.
I opted to scratch-build these four models for my client rather than buy and assemble four GNHS kits, since it's actually a savings for him -- cutting the pieces myself and assembling them takes only slightly more time than merely assembling a kit. This also means the money I would have spent on the kits -- which are about $25 each -- goes directly in my pocket. Another advantage to me is: I only charge the client for the time spent on the buildings I make for him, and I track my time very carefully, so as I go along, I can make a fifth model on my own time and at my own expense, and sell it to another client later.
Monday, January 4, 2016
The Statue Got Me High, Part 3
I finished the tiny statue of John Stephens for the Marias Pass section of my client's layout.
Not a perfect match, as you can see when compared side-by-side, but darned close. The prototype coat is shorter, and my collar turned out differently, because I had to wrap it around farther to make it match the figure. My model is about 12' in HO scale, and my guess is the prototype is around 10'.
Here's what the original 1/48th scale figure, from The Model Cellar, looked like on their web page.
He arrived in four pieces: body & legs, arms, and head. Before assembling, I used an X-acto to shave away the upturned collar and diagonal map pocket on the body, as well as the glove he held in his left hand. Then I assembled him with CA glue and shaved away a bit more of the helmet on each side of his head. I made his collar by cutting a small crescent moon shape from the foil you find around the neck of a wine bottle (incredibly handy stuff, that), and attached it with CA glue. I added some small creases to the collar by pressing it with a large sewing needle. I then attached the figure to a small square of styrene, again with CA glue.
To change his headgear from a leather helmet with a brim, I took a very thin strip of blue paper shop towel, soaked it in CA glue and wrapped it around his head. The porous surface looks a lot like sheepskin when you view it with a magnifier.
The primer coat came from a $1 rattle can of matte black. Then I brushed on two coats of thinned green/bronze acrylic mix, waited for that to dry, and then I applied the very thin turquoise patina coat. As you can see in earlier posts, I did a fair amount of experimentation to get that color mix.
The base is made of several slabs of chipboard soaked in CA glue. I simulated the pink granite (?) base with pale magenta acrylic splattered with darker magenta and off-white, with a final grimy wash of India ink thinned with isopropol alcohol to grunge it up a little.
Total assembly and painting time was just a couple hours... as long as you don't count all the time I spent thinking about how to do it over the last few months.
By the way, in case you wondered why I gave these posts such an odd title...
And here's another song about a statue that ran through my head as I worked on this...
Not a perfect match, as you can see when compared side-by-side, but darned close. The prototype coat is shorter, and my collar turned out differently, because I had to wrap it around farther to make it match the figure. My model is about 12' in HO scale, and my guess is the prototype is around 10'.
Here's what the original 1/48th scale figure, from The Model Cellar, looked like on their web page.
He arrived in four pieces: body & legs, arms, and head. Before assembling, I used an X-acto to shave away the upturned collar and diagonal map pocket on the body, as well as the glove he held in his left hand. Then I assembled him with CA glue and shaved away a bit more of the helmet on each side of his head. I made his collar by cutting a small crescent moon shape from the foil you find around the neck of a wine bottle (incredibly handy stuff, that), and attached it with CA glue. I added some small creases to the collar by pressing it with a large sewing needle. I then attached the figure to a small square of styrene, again with CA glue.
To change his headgear from a leather helmet with a brim, I took a very thin strip of blue paper shop towel, soaked it in CA glue and wrapped it around his head. The porous surface looks a lot like sheepskin when you view it with a magnifier.
The primer coat came from a $1 rattle can of matte black. Then I brushed on two coats of thinned green/bronze acrylic mix, waited for that to dry, and then I applied the very thin turquoise patina coat. As you can see in earlier posts, I did a fair amount of experimentation to get that color mix.
The base is made of several slabs of chipboard soaked in CA glue. I simulated the pink granite (?) base with pale magenta acrylic splattered with darker magenta and off-white, with a final grimy wash of India ink thinned with isopropol alcohol to grunge it up a little.
Total assembly and painting time was just a couple hours... as long as you don't count all the time I spent thinking about how to do it over the last few months.
By the way, in case you wondered why I gave these posts such an odd title...
And here's another song about a statue that ran through my head as I worked on this...
Friday, December 25, 2015
The Statue Got Me High, Part 2
I think I have the colors just right now...
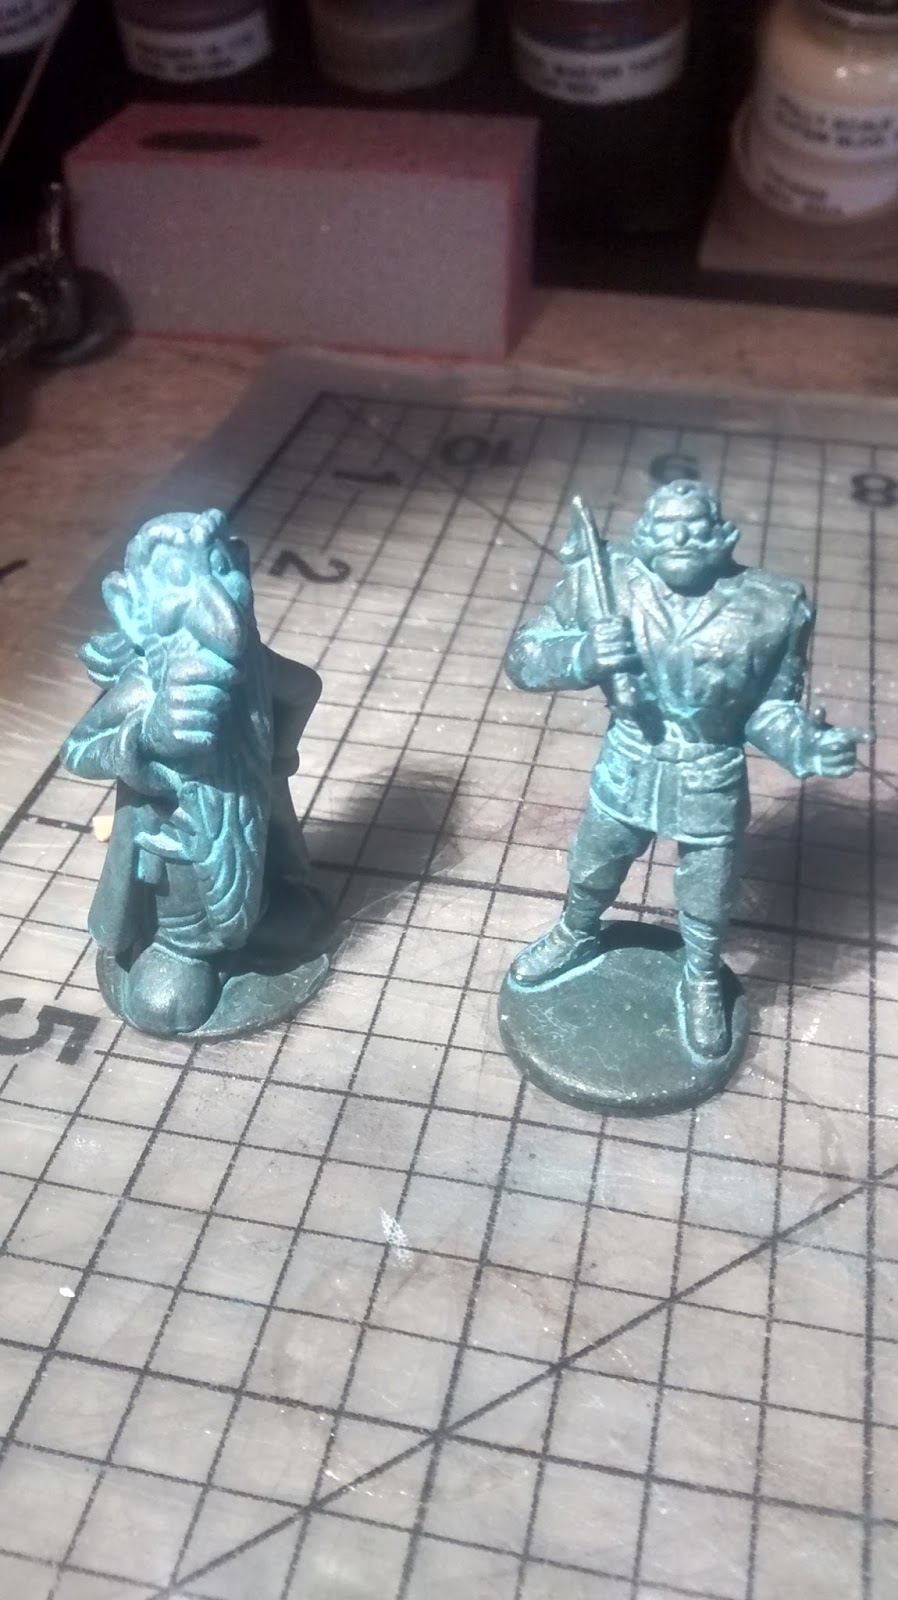
The figures: A Kinder Surprise toy of Getafix (from the Asterix comic books) and two Clue Master Detective figurines, Colonel Mustard and Prince Azure.I really like how Getafix turned out. He looks like something from Discworld.
The base: bits of chipboard, painted pink-ish to simulate the stone base of the statue I'm replicating for my client.
Primer coat: cheap rattle-can black from Home Depot.
Base coat: FolkArt Sap Green, mixed with a bit of DecoArt Rich Espresso metallic and a few drops of black craft paint. Thinned with a little Windsor & Newton Flow Improver.
Patina: DecoArt Desert Turquoise, thinned with a little flow improver and a lot of distilled water. (I tried using alcohol, as per a couple online instructions, but I ended up with the alcohol fusing with the pigment and making a horrible phlegmy blob in the bottom of the bottle.) I gave the statues two coats of patina, making sure a lot of it settled into the folds and crevices of the figures.
Labels:
1/48,
1/87,
Asterix,
Clue,
Cluedo,
Colonel Mustard,
DecoArt,
FolkArt,
Getafix,
great northern railroad,
HO scale,
John Stephens,
Marias Pass,
O Scale,
paint,
painting,
Prince Azure,
statue,
weathering,
Windsor & Newton
Tuesday, December 22, 2015
The Statue Got Me High
Well, not really. But I have been thinking about how to make a statue for a client's layout for a while, and today I tested some paints, and I think I've got it.
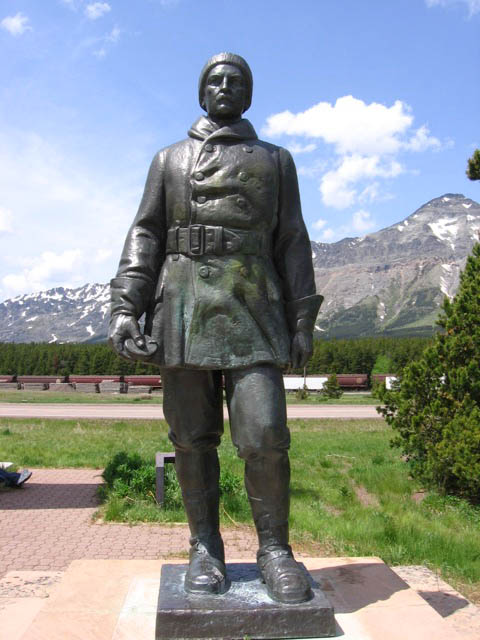
Here is the statue the client needs:
It's John Stevens, the man who surveyed the route that eventually became part of the Great Northern Railroad line.
My client's layout is HO scale, so my thinking was, I can use an O scale figure, and it would be "larger-than-life" compared to an HO scale figure... just about the right size of 10 HO scale feet tall. If you compare the size of the pointing fellow to the size of Stevens, the ratio sure looks to me like HO to O.
The question was, what figure to use? I searched everywhere for mountain men, fur trappers, hunters, native Americans... anything that might come close to replicating that outfit, but I came up with nothing that was going to work.
Then one day, I got a bright idea. What about fighter pilots?
Here's a different view of the sculpture...
...and get a load of this WWI British pilot! He's in practically the same pose!
I'll have to modify or replace his head, but otherwise, it's a really good match, and it's 1/48th scale, which is standard USA O scale. Even though we won't be building that part of the layout for months, I ordered him today, since cottage companies like The Model Cellar tend to go under with no notice.
Anyway, today I got a bee in my bonnet about testing out some painting and weathering techniques for this statue, and so I went to the craft store to pick up some cheap bronze and turquoise paint. Then I went home and dug around in my gaming box for some board game figurines I've used as tokens for Cheapass Games. I grabbed a Homies figurine of a mariachi violin player, sprayed him matte black with a rattle can, gave him two coats of bronze and a wash of thinned turquoise, and came up with this.
The base is three squares of chipboard, toughened up with a bit of super glue, painted with two shades of Badger concrete and weathered with india ink in isopropyl alchohol. I think for the final model, I'll darken that bronze paint with quite a lot of dark green, but apart from that, I think I've got it.
Here is the statue the client needs:
It's John Stevens, the man who surveyed the route that eventually became part of the Great Northern Railroad line.
My client's layout is HO scale, so my thinking was, I can use an O scale figure, and it would be "larger-than-life" compared to an HO scale figure... just about the right size of 10 HO scale feet tall. If you compare the size of the pointing fellow to the size of Stevens, the ratio sure looks to me like HO to O.
The question was, what figure to use? I searched everywhere for mountain men, fur trappers, hunters, native Americans... anything that might come close to replicating that outfit, but I came up with nothing that was going to work.
Then one day, I got a bright idea. What about fighter pilots?
Here's a different view of the sculpture...
...and get a load of this WWI British pilot! He's in practically the same pose!
I'll have to modify or replace his head, but otherwise, it's a really good match, and it's 1/48th scale, which is standard USA O scale. Even though we won't be building that part of the layout for months, I ordered him today, since cottage companies like The Model Cellar tend to go under with no notice.
Anyway, today I got a bee in my bonnet about testing out some painting and weathering techniques for this statue, and so I went to the craft store to pick up some cheap bronze and turquoise paint. Then I went home and dug around in my gaming box for some board game figurines I've used as tokens for Cheapass Games. I grabbed a Homies figurine of a mariachi violin player, sprayed him matte black with a rattle can, gave him two coats of bronze and a wash of thinned turquoise, and came up with this.
The base is three squares of chipboard, toughened up with a bit of super glue, painted with two shades of Badger concrete and weathered with india ink in isopropyl alchohol. I think for the final model, I'll darken that bronze paint with quite a lot of dark green, but apart from that, I think I've got it.
Saturday, April 25, 2015
Test Results on Warping
To recap, I put three cardstock models in my bathroom and left them there for a week to see if the steam from showering would warp them.
I don't time my showers, but here's how they go -- I shower for about 10 or even 15 minutes, get out, open the bathroom door so the fog will clear from the mirror. I took six showers in that seven days and my wife used the tub to take one bath. (She has her own bathroom with just a shower, just in case you think she only bathed once this week). When I take a shower, the humidity on that shelf goes from about 65% to 85% -- yep, I measured it.
The first little model was an onion dome from the Tower of London. It didn't warp at all. (No photos, but just trust me.)
The second was a trackside beanery I built to the specifications of a client -- and his measurements were all wrong, so I didn't care if the model was ruined.
It wasn't. There's a tiny bend up and down along the doors and windows of the long side, but it's barely noticeable -- it would certainly pass inspection under the three foot rule. The short side looks fine. The roof, which isn't reinforced with trusses, also looks fine. I expect this very minimal amount of warping will even out when it fully dries.
Here's what I think goes on: the tabs and folded edges of the model act as reinforcements. The chipboard base and the roof serve the same function. The model might tend to warp along the direction of the grain of the cardstock, but the tabs and edges resist that tendency, and it all evens out.
On the second day of the test, I added the third model. It's been subjected to five showers worth of damp air.
It's not really a model, per se; it's just a bit of O-scale wall and a window that I built as a reference so I can see all the layers required to make a sash window. The wall is chipboard laminated with a cardstock printout. It did warp quite a bit.
Notice how it warped: side to side. This could be due to the differences in expansion between the thin cardstock and the thick chipboard. (That's why it's always best to laminate with a non-water-based glue.) I expect with a roof glued on, this side to side warping would have minimized. If I'd included a simple tab along the bottom or top, I think it would have remained straight. It remains to be seen whether it will flatten out when it dries. (UPDATE: It did.)
My conclusion is: a complete cardstock model that has a lot of tabs and folded edges will be fine.
Also, if your basement or layout room is so consistently damp that it could warp a cardstock model, I suspect you'll have even worse problems with mildew, or corrosion of electrical connections.
I don't time my showers, but here's how they go -- I shower for about 10 or even 15 minutes, get out, open the bathroom door so the fog will clear from the mirror. I took six showers in that seven days and my wife used the tub to take one bath. (She has her own bathroom with just a shower, just in case you think she only bathed once this week). When I take a shower, the humidity on that shelf goes from about 65% to 85% -- yep, I measured it.
The first little model was an onion dome from the Tower of London. It didn't warp at all. (No photos, but just trust me.)
The second was a trackside beanery I built to the specifications of a client -- and his measurements were all wrong, so I didn't care if the model was ruined.
It wasn't. There's a tiny bend up and down along the doors and windows of the long side, but it's barely noticeable -- it would certainly pass inspection under the three foot rule. The short side looks fine. The roof, which isn't reinforced with trusses, also looks fine. I expect this very minimal amount of warping will even out when it fully dries.
Here's what I think goes on: the tabs and folded edges of the model act as reinforcements. The chipboard base and the roof serve the same function. The model might tend to warp along the direction of the grain of the cardstock, but the tabs and edges resist that tendency, and it all evens out.
On the second day of the test, I added the third model. It's been subjected to five showers worth of damp air.
It's not really a model, per se; it's just a bit of O-scale wall and a window that I built as a reference so I can see all the layers required to make a sash window. The wall is chipboard laminated with a cardstock printout. It did warp quite a bit.
Notice how it warped: side to side. This could be due to the differences in expansion between the thin cardstock and the thick chipboard. (That's why it's always best to laminate with a non-water-based glue.) I expect with a roof glued on, this side to side warping would have minimized. If I'd included a simple tab along the bottom or top, I think it would have remained straight. It remains to be seen whether it will flatten out when it dries. (UPDATE: It did.)
My conclusion is: a complete cardstock model that has a lot of tabs and folded edges will be fine.
Also, if your basement or layout room is so consistently damp that it could warp a cardstock model, I suspect you'll have even worse problems with mildew, or corrosion of electrical connections.
Tuesday, January 27, 2015
NWSL Chopper II Hack
Just got a NorthWest Short Line Chopper II, and it's a delight to use. I think they missed a trick, though, so I made a slight modification to the cutting surface -- I designed and printed two new scales in HO and O, and attached them to the edge, with the zeroes touching the razor. Now I can chop things in scale much more quickly.
Wednesday, November 26, 2014
More Stereo Views of My Models
I took these by setting the camera on the table, taking one shot, then sliding the camera about 3/4" and taking the second shot.
I printed these on 4x6 photo paper, then trimmed them to fit in a viewer I got from a book.
These are all for free-viewing.
These two are from Discworld. First the Library:
And the High Energy Magic Building:
This is the Gorre Water Tower by Clever Models:
This is a scratch-built wooden depot, based on a Clever Models template:
Sunday, October 26, 2014
1/87 Mountain Goat
I made this because I'm surprised to learn that there is practically no HO scale American wildlife available.
Sculpey & Liquid Sculpey on an aluminium armature, painted with acrylic.
Pretty rough sculpt, but it is very small. There's a bit of a penny in the lower left for scale.
Sculpey & Liquid Sculpey on an aluminium armature, painted with acrylic.
Pretty rough sculpt, but it is very small. There's a bit of a penny in the lower left for scale.
Labels:
1/87,
figures,
goat,
great northern railroad,
HO scale,
liquid sculpey,
miniature figure,
miniature wildlife figure,
model railroad,
model railroad wildlife,
Mountain goat,
scenery,
sculpey,
tiny,
wildlife
Subscribe to:
Posts (Atom)