Showing posts with label paint. Show all posts

Sunday, September 4, 2016

Replacement for Ertl plastic powerhouse.

A client sent me an HO scale Ertl kit, the Easton Mill. It consists of two plastic buildings, but the sculpt, fit and factory paint-and-weathering on them... let's see, how to say this nicely... it's not up to my standards.


I talked my client into allowing me to build the power house as a cardstock model. I pulled all the dimensions from the Ertl kit and then made it in The Gimp.

Here it is.

Stereoscopic View
 

The main part of the building is inkjet-printed cardstock laminated onto museum board. I used Clever Models textures, as usual. I laminate with the cheapest spray adhesive I can find, which happens to be Aleen's Tacky Spray. (I'll have to do a proper how-to post on this technique when I find the time.)

The most painstaking part of this build: I cut out the doors and windows, then painted the thick edges of the holes with neutral grey acrylic, then I used brown, yellow and grey gouache paints to touch up the edges to match the stones.

I tried a new technique for the steps; I made the bottom tread part of the base of the building. That way, there's no chance of the steps falling off if the structure is handled roughly. Once I had the steps assembled, I treated the edges with cyanoacrylate glue and sanded the edges. 


The original model included a boiler out front, and I replicated it with two caps from Trader Joe's disposable pour-over coffee brewers, along with some brass tubing scraps and bits of museum board.

All in all, a quick and fun project.

Monday, January 4, 2016

The Statue Got Me High, Part 3

I finished the tiny statue of John Stephens for the Marias Pass section of my client's layout.


Not a perfect match, as you can see when compared side-by-side, but darned close. The prototype coat is shorter, and my collar turned out differently, because I had to wrap it around farther to make it match the figure. My model is about 12' in HO scale, and my guess is the prototype is around 10'.

Here's what the original 1/48th scale figure, from The Model Cellar, looked like on their web page.


He arrived in four pieces: body & legs, arms, and head. Before assembling, I used an X-acto to shave away the upturned collar and diagonal map pocket on the body, as well as the glove he held in his left hand. Then I assembled him with CA glue and shaved away a bit more of the helmet on each side of his head. I made his collar by cutting a small crescent moon shape from the foil you find around the neck of a wine bottle (incredibly handy stuff, that), and attached it with CA glue. I added some small creases to the collar by pressing it with a large sewing needle. I then attached the figure to a small square of styrene, again with CA glue.

To change his headgear from a leather helmet with a brim, I took a very thin strip of blue paper shop towel, soaked it in CA glue and wrapped it around his head. The porous surface looks a lot like sheepskin when you view it with a magnifier.

The primer coat came from a $1 rattle can of matte black. Then I brushed on two coats of thinned green/bronze acrylic mix, waited for that to dry, and then I applied the very thin turquoise patina coat. As you can see in earlier posts, I did a fair amount of experimentation to get that color mix.

The base is made of several slabs of chipboard soaked in CA glue. I simulated the pink granite (?) base with pale magenta acrylic splattered with darker magenta and off-white, with a final grimy wash of India ink thinned with isopropol alcohol to grunge it up a little.

Total assembly and painting time was just a couple hours... as long as you don't count all the time I spent thinking about how to do it over the last few months.

By the way, in case you wondered why I gave these posts such an odd title...


And here's another song about a statue that ran through my head as I worked on this...


Friday, December 25, 2015

The Statue Got Me High, Part 2

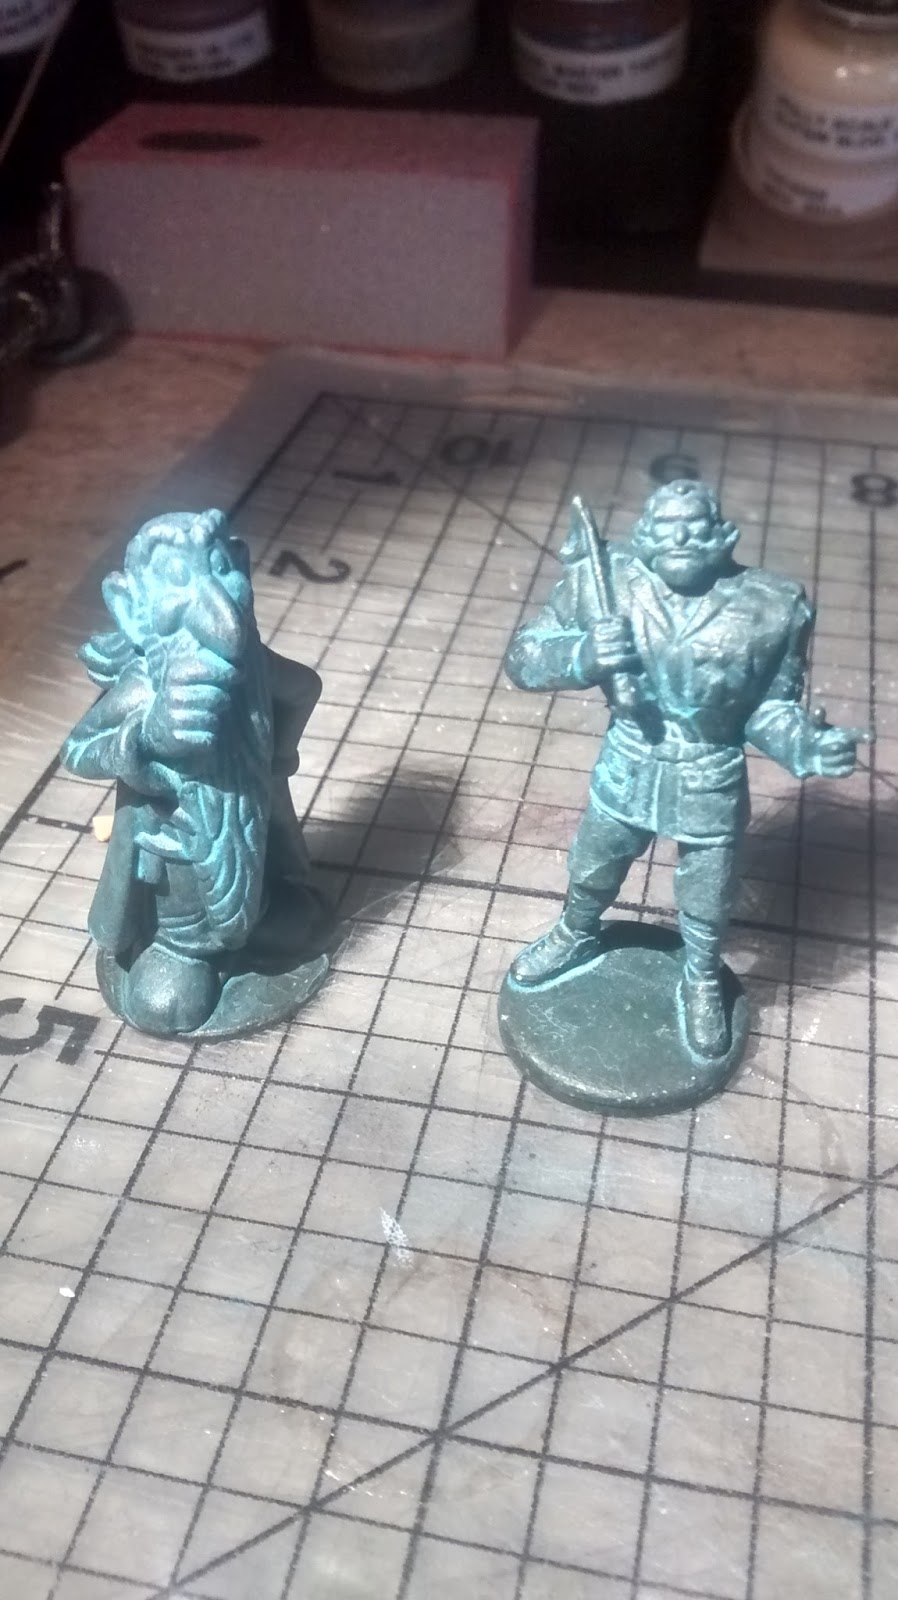
I think I have the colors just right now...


The figures: A Kinder Surprise toy of Getafix (from the Asterix comic books) and two Clue Master Detective figurines, Colonel Mustard and Prince Azure.
The base: bits of chipboard, painted pink-ish to simulate the stone base of the statue I'm replicating for my client.

Primer coat: cheap rattle-can black from Home Depot.

Base coat: FolkArt Sap Green, mixed with a bit of DecoArt Rich Espresso metallic and a few drops of black craft paint. Thinned with a little Windsor & Newton Flow Improver.

Patina: DecoArt Desert Turquoise, thinned with a little flow improver and a lot of distilled water. (I tried using alcohol, as per a couple online instructions, but I ended up with the alcohol fusing with the pigment and making a horrible phlegmy blob in the bottom of the bottle.) I gave the statues two coats of patina, making sure a lot of it settled into the folds and crevices of the figures.
 I really like how Getafix turned out. He looks like something from Discworld.

Tuesday, July 14, 2015

Gorre & Daphetid's #13 Engine, "Emma the Organic Switcher" in N Scale

Fooling around with N scale stuff, and I'm about to begin building Clever Model's version of John Allen's famous engine house at Gorre, when it dawned on me that I'd need Allen's "Organic Switcher" #13, Emma the stegosaurus. Couldn't find a toy dinosaur in the appropriate size, so I made one from Sculpey.

 Here she is standing on a penny.


Aluminium foil armature, painted with acrylics, gold ink for the number 13, coated with MicroScale satin to give it that 1960s plastic dinosaur look. She's not an exact match, but close enough.

Here's the prototype...

She's hiding on a hillside in this shot, 
just under the NMRA Bulletin masthead.

Now I have to make a harness.

Tuesday, December 16, 2014

My Workshop in a Cigar Box

I'm getting ready to go on a holiday trip, so I'm getting all my model building tools ready to take along with me. I decided to pack everything I like to use into a small cigar box, just for the sake of living up to the old Micromodels' slogan: "Your Workshop in a Cigar Box."

Here's the box in question. I think I paid $2 for this at a nearby cigar shop.


 Here it is opened and stuffed with tools. That thing on the top is a plastic tile with a magnet on top of it, and a fridge magnet stuck to that. Good for pressing small pieces together for laminating.


My self-healing cutting mat. It's a bit odd, I think because it's a promotional item and it's supposed to be a miniature of a larger mat: the markings are in millimeters and inches, but they're far smaller than the actual units of measurement. 


My hobby knife handle. I've already sent myself a stamped, self-addressed envelope with all my #11 blades, so the TSA has no excuse to take my fun away.

The goofy eraser on the end is a Japanese thing: an unhappy tooth with a cavity. I use it here because it's roughly square, so the knife won't roll of the table and stab me in the thigh (or worse).


Two tiny sharpening tools. On the right is a ceramic rod sharpening widget. It was originally about 2" x 2", but I used my Dremel to cut away everything it didn't need to do its job. I've found I can extend the life of a #11 blade by about five or six times, just by whisking it a few times through this and then stropping the burrs off with the piece of leather on the left. I've heard tell of hobbyists who carefully sharpen the same blade for years and years... and that's a lot more than I'm willing to do.


A 6" General Tools steel ruler. This one is good, but it's not my favorite. I mailed my favorite (a vintage, nickle-plated promotional ruler from a metal supply company)  forward in the SASE, just in case someone at the TSA says a stupid person might confuse it with a knife blade. Fine. Whatever. They can take away my not-favorite ruler.


Three different glues. The top is an Aleene's Tacky Glue pen. In the middle is a modified water brush (more on these later) filled with thinner PVA bookbinding glue. On the bottom is a glue stick, for laminating pieces.


A triangle. Pretty good for getting right angles.


A small roll of drafting dots. They're just little dots of masking tape. 


An Altoids Smalls tin, containing...


...a tiny watercolor/gouache set for edging the cardstock. The most used colors in here are the neutral greys. Watercolors work well for me because I can mix the colors I need in advance, let them dry, and all it takes to get them working is a drop of water.

This watercolor set is easy to make -- I just put a layer of white Sculpey along the bottom, pressed the bottom of a large X-Acto handle into it to make indentations, baked it, and filled the indentations with gouache.

The little green globs are poster putty. It's sometimes useful for test-fitting parts.


The Pentel water brush. This is the best tool for coloring the edges of paper models I know of. I've used watercolors for this task for years, and this brush makes it a cinch. The body of the brush holds water, which you squeeze through the bristles. Very useful if you change colors a lot, because you can clean the brush easily -- just squeeze into a napkin or tissue and rub a few times.


A couple pencil stubs. Stubs because they fit in the box; Palomino Blackwings because they write nicely. 


The uncut models are in this cardboard box.


They're printed on matte photo cardstock, chopped down to postcard size, and I've already sprayed them with matte fixative, so they're all ready to go.


I've got a hotel and a small machine shop from Clever Models. (By the way, they're running a Buy-One-Get-One-Free sale until 12/24/14. That's how I bought these.) I reduced the O scale models down to N scale. At that reduction, two pages of the original model fit on the postcard-sized paper. I've also printed the windows on transparency film, and sprayed that with fixative to make them a little opaque.


I use this nice antique box to hold completed tiny pieces.


 I've already cut some discs to use to shape the machine shop's water tank.


Monday, October 20, 2014

Waiting for a big project...

I'm waiting on a big project to start early next year, and I figured I'd use the time to improve my workbench a bit. I've been watching a lot of how-to videos, and noticed a lot of people had some sort of shallow shelf to keep their paint and glue close at hand. Using a piece of scrap black plastic, I threw this together in about 45 minutes, not counting the time spent waiting for the glue to set. I used Shoe Goo, because that stuff is pretty tough.


It's nothing fancy, but it will hold larger bottles on the top shelf, and small paint bottles on the bottom.