Sunday, July 20, 2014

Gorre Water Tower

Spent a few days working on this papercraft kit from Clever Models. Their downloads and CDs are on sale for 40% off this month, so I bought several.

My build:


 From a 1965 article in Model Railroader magazine:


I modified the tank to include the Gorre & Daphetid logo, and spent some extra time trying to match the vintage advertising to what was shown in a 1965 how-to article. I printed these tiny posters on cigarette papers, which is a technique I'll have to make a video about at some point. The thinness of the cigarette papers allows you to curl the edges of the posted items so they look like they've been there a long time.


I'm not entirely satisfied with my pulley and the armature that holds it -- I made it stick out too far -- but it looks like it would be functional, and that's quite good enough for now. Also, it would look nicer with chain instead of rope, but I like it almost as much this way.

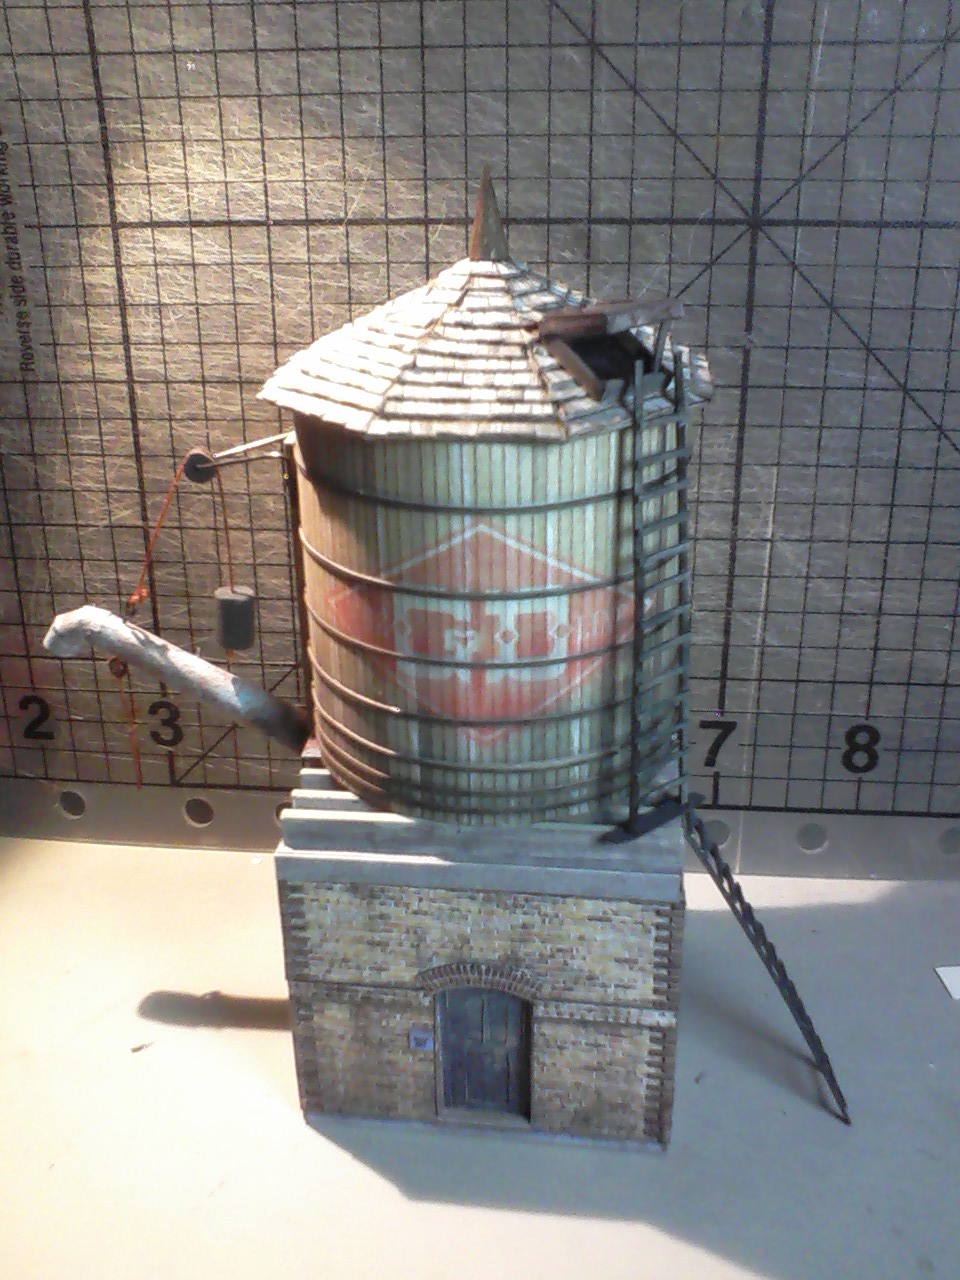
Still need to add a smokejack, but it's essentially done.

Silverback Falls Flag Stop Depot

Finished last week. HO scale. Mostly wood, with a card stock and cardboard roof.  The roof is removable because I have a notion to add a tiny speaker, hide an Arduino board under the platform, and then set up the whole gubbins to go online and translate tweets into Morse code.


Thursday, July 10, 2014

Three Attempts at a Depot Roof

Here are all three attempts I made on this roof, ending with the correct one on the top of the depot. The first two had problems -- first, the printout from Kinko's was too glossy, even after being sprayed with matte fixative. Makes it look like it just finished raining. (The glossy printouts worked fine for the porcelain signs on the sides of the depot, though.) Second problem: the further up I went with the strips of shingles, the more cattywampus they became.


To solve the first problem, I decided to print the shingles on my home inkjet printer. Then I sprayed the whole sheet with fixative so I wouldn't have to worry if the water-based glue smeared a little.

I solved the second problem by opening the GIMP and adding some horizontal lines to the underlayer of the roof. It was a little like snapping a chalked line would be in the real world.

I let just a bit of the shingles hang off the edge, then trimmed them back to the thickness of the green trim I'm using on the rest of the building. When I add the trim, it will go just under the shingles.


I edged all the cardstock with a neutral grey Prismacolor felt tip pen. Bleeds a little, but not enough to be seen on the printed side. 

I cut off about 900 little white triangles of paper in the making of the shingle strips.

Tuesday, July 8, 2014

Tiny Depot

In July, Clever Models has a sale on their papercraft models. I bought a bunch, and I'm using their small depot as a template for a wooden model, which I'm building from scraps.


I decided it needed a station clock...


More to follow.