Showing posts with label 1/48. Show all posts

Monday, January 4, 2016

The Statue Got Me High, Part 3

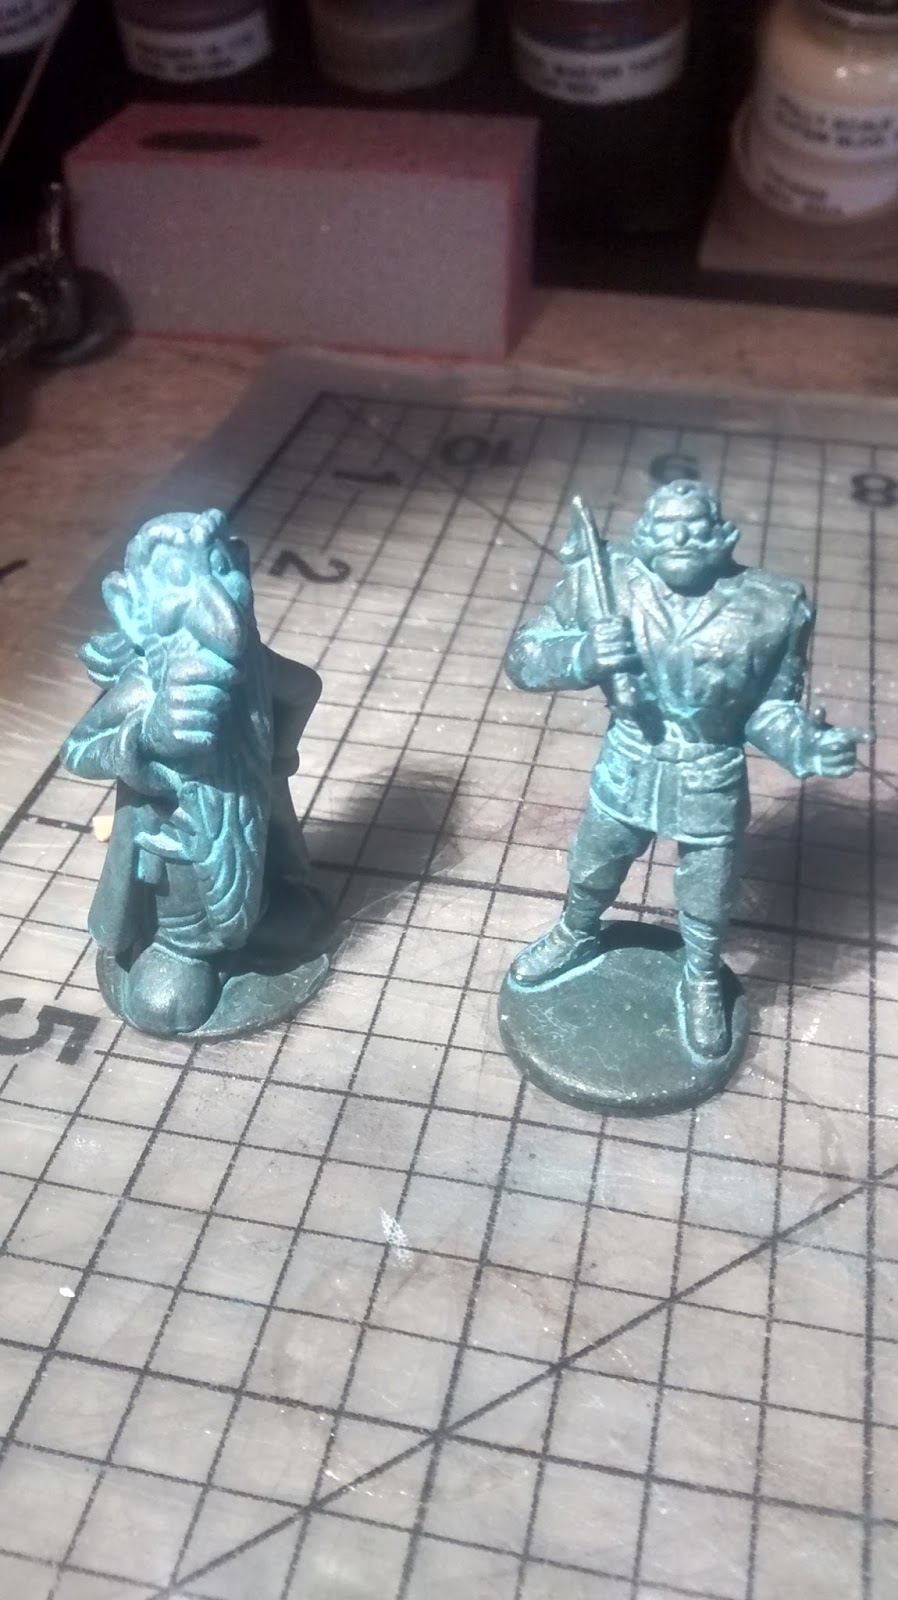
I finished the tiny statue of John Stephens for the Marias Pass section of my client's layout.


Not a perfect match, as you can see when compared side-by-side, but darned close. The prototype coat is shorter, and my collar turned out differently, because I had to wrap it around farther to make it match the figure. My model is about 12' in HO scale, and my guess is the prototype is around 10'.

Here's what the original 1/48th scale figure, from The Model Cellar, looked like on their web page.


He arrived in four pieces: body & legs, arms, and head. Before assembling, I used an X-acto to shave away the upturned collar and diagonal map pocket on the body, as well as the glove he held in his left hand. Then I assembled him with CA glue and shaved away a bit more of the helmet on each side of his head. I made his collar by cutting a small crescent moon shape from the foil you find around the neck of a wine bottle (incredibly handy stuff, that), and attached it with CA glue. I added some small creases to the collar by pressing it with a large sewing needle. I then attached the figure to a small square of styrene, again with CA glue.

To change his headgear from a leather helmet with a brim, I took a very thin strip of blue paper shop towel, soaked it in CA glue and wrapped it around his head. The porous surface looks a lot like sheepskin when you view it with a magnifier.

The primer coat came from a $1 rattle can of matte black. Then I brushed on two coats of thinned green/bronze acrylic mix, waited for that to dry, and then I applied the very thin turquoise patina coat. As you can see in earlier posts, I did a fair amount of experimentation to get that color mix.

The base is made of several slabs of chipboard soaked in CA glue. I simulated the pink granite (?) base with pale magenta acrylic splattered with darker magenta and off-white, with a final grimy wash of India ink thinned with isopropol alcohol to grunge it up a little.

Total assembly and painting time was just a couple hours... as long as you don't count all the time I spent thinking about how to do it over the last few months.

By the way, in case you wondered why I gave these posts such an odd title...


And here's another song about a statue that ran through my head as I worked on this...


Friday, December 25, 2015

The Statue Got Me High, Part 2

I think I have the colors just right now...


The figures: A Kinder Surprise toy of Getafix (from the Asterix comic books) and two Clue Master Detective figurines, Colonel Mustard and Prince Azure.
The base: bits of chipboard, painted pink-ish to simulate the stone base of the statue I'm replicating for my client.

Primer coat: cheap rattle-can black from Home Depot.

Base coat: FolkArt Sap Green, mixed with a bit of DecoArt Rich Espresso metallic and a few drops of black craft paint. Thinned with a little Windsor & Newton Flow Improver.

Patina: DecoArt Desert Turquoise, thinned with a little flow improver and a lot of distilled water. (I tried using alcohol, as per a couple online instructions, but I ended up with the alcohol fusing with the pigment and making a horrible phlegmy blob in the bottom of the bottle.) I gave the statues two coats of patina, making sure a lot of it settled into the folds and crevices of the figures.
 I really like how Getafix turned out. He looks like something from Discworld.

Tuesday, December 22, 2015

The Statue Got Me High

Well, not really. But I have been thinking about how to make a statue for a client's layout for a while, and today I tested some paints, and I think I've got it.

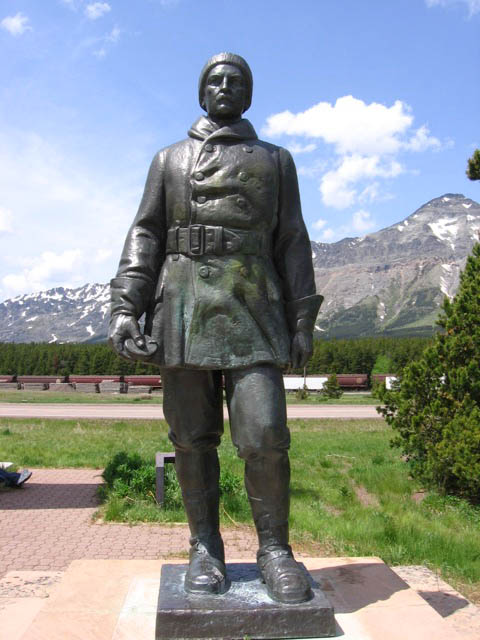
Here is the statue the client needs:


It's John Stevens, the man who surveyed the route that eventually became part of the Great Northern Railroad line.

My client's layout is HO scale, so my thinking was, I can use an O scale figure, and it would be "larger-than-life" compared to an HO scale figure... just about the right size of 10 HO scale feet tall. If you compare the size of the pointing fellow to the size of Stevens, the ratio sure looks to me like HO to O.

The question was, what figure to use? I searched everywhere for mountain men, fur trappers, hunters, native Americans... anything that might come close to replicating that outfit, but I came up with nothing that was going to work.

Then one day, I got a bright idea. What about fighter pilots?

Here's a different view of  the sculpture...


...and get a load of this WWI British pilot! He's in practically the same pose!


I'll have to modify or replace his head, but otherwise, it's a really good match, and it's 1/48th scale, which is standard USA O scale. Even though we won't be building that part of the layout for months, I ordered him today, since cottage companies like The Model Cellar tend to go under with no notice. 

Anyway, today I got a bee in my bonnet about testing out some painting and weathering techniques for this statue, and so I went to the craft store to pick up some cheap bronze and turquoise paint. Then I went home and dug around in my gaming box for some board game figurines I've used as tokens for Cheapass Games. I grabbed a Homies figurine of a mariachi violin player, sprayed him matte black with a rattle can, gave him two coats of bronze and a wash of thinned turquoise, and came up with this.

The base is three squares of chipboard, toughened up with a bit of super glue, painted with two shades of Badger concrete and weathered with india ink in isopropyl alchohol. I think for the final model, I'll darken that bronze paint with quite a lot of dark green, but apart from that, I think I've got it.

Sunday, March 1, 2015

INSPIRATION: Adam Savage's O Scale build of the Hedge Maze from "The Shining"

This is quite a work of art! He used flocked particleboard, and every piece is screwed down to the base. There are, as always, a lot of good tips sprinkled through this rather long video. I'm feeling slightly shamed, as I abandoned a 1979 papercraft model of the Timberline Lodge in mid-build. The parts didn't fit properly. This was a particularly frustrating build, as I made a multi-level foamcore base, which fit the model really well, and color copied all the pieces so I could keep the original printed model intact. After two days work, I found that whoever designed the model obviously didn't do a test build, as the roofs didn't fit at all and many of the dormers were misaligned. (I'd forgotten this sort of thing was frequently a problem with ambitious 1970s card models.) To top it all off, I was building it to exhibit at the PDX Mini MakerFair, and when I realized it couldn't be finished without major redesign work, I had to kick myself for all the time I'd wasted on it. I thought briefly about buying some Xmas spray foam snow to cover the roofs' flaws, but even that wouldn't have worked with all the gaps. Days of work, into the dumpster!
Anyway, when I started, somebody joked I should build a hedge maze next to it. Sadly, I couldn't even finish the damn hotel.