

An ongoing diary of miniatures I've built, as well as links to inspiring scale models.
Tuesday, January 15, 2019
Progress on Kitbashed Clever/Jordan Caboose/Railcar
Pulled apart an N-scale loco and passenger car for parts....


Tuesday, December 4, 2018
Railcar and a Sidetrack
Two little projects on my workbench: the railcar kitbash and a luggage cart.

I've only gotten this far, but it's a start.
Then I discovered an article written by John Allen on how to build a luggage cart, and I decided to modify his design a little and try my hand at it.
Here's his design.

Here's my progress so far on a card model version. I've added an extra rack to the back, per some prototypes, along with lettering on the side. Allen's wheels were acetate with the spokes drawn on; I decided to cut the spokes out, add rims and wrap a paper band around the outside.


I've only gotten this far, but it's a start.
Then I discovered an article written by John Allen on how to build a luggage cart, and I decided to modify his design a little and try my hand at it.
Here's his design.

Here's my progress so far on a card model version. I've added an extra rack to the back, per some prototypes, along with lettering on the side. Allen's wheels were acetate with the spokes drawn on; I decided to cut the spokes out, add rims and wrap a paper band around the outside.

Thursday, November 29, 2018
Next Project: Kitbashed Clever Models Caboose into Railcar
I decided my next project should be an HOn30 whimsical railcar. (It'll just be stationary.) I'm kitbashing together the following three things:
- A Jordan Highway Miniatures Model T Ford stake-bed pickup truck,
- A Clever Models caboose,
- Some N Scale wheels I had from another project.
Here's my mockup, just to get some of the sizes and proportions the way I want them.

I always like to use bogus train line names, and "Shamrock" has been a recurring word in my work, so I made a new logo for the Shamrock Island Line. (After all, it's not the REAL Rock Island Line!)

Here are some of my other bogus signs and logos...


My take on the old AT&T logo.


Obviously based on the Nickle Plate Road logo...
Tuesday, November 27, 2018
Clever Models Gateman Tower: Completed

Sunday, November 25, 2018
Clever Models Gateman Tower, Test Fitting Sub-Assemblies
I am 5/8ths done with the upper tower walls and windows.

Here's what I have so far, roughly balanced together in order to see if I've screwed anything up.

My original plan was to light the inside, but at this point, that's too much of a hassle. I did sandwich a layer of black cardstock between the outer and inner surfaces, so if I do light it later, the light won't shine through the walls.
Friday, November 23, 2018
Clever Lever
I'm finally getting around to finishing my build of Clever Models' Octagonal Gateman's Tower.

I've had the stairs done and sitting around for a long time now; I guess it's time to finish the durn fool thing.

The project of the last couple days was making the lever which operates the gates. After Googling around, I found the following image showing the proportions of the lever.


From that, I was able to get my measurements. My first attempt was made from black cardstock, which looked all wrong. Then I took some stiff wire intended for earring and jewelry making, along with the foil cap from a wine bottle, and made this:

I assembled the whole thing with CA glue, and wrapped the top and bottom with a thin strip of the wine foil cap, and added a drop of black acrylic paint to the tips of the levers to resemble the rounded ends of the handles. I think that's about as close as I can get to the prototype, given the supplies I had on hand.
Putting clear windows in this beast at HO scale is very difficult indeed; I'm getting quite a bit of squeezeout from the CA glue, but I've decided it's pretty minor, given the scale, and it looks a bit like cobwebs. Cobwebs, yeah, sure, that's the ticket!
I'll probably make the roof removable if I decide I can't see the details through the windows.

I've had the stairs done and sitting around for a long time now; I guess it's time to finish the durn fool thing.

The project of the last couple days was making the lever which operates the gates. After Googling around, I found the following image showing the proportions of the lever.

I zoomed in on just the tower, and in GIMP, I pasted the cropped image below over the Clever PDF, sizing it to get it to match the size of the upper room.

From that, I was able to get my measurements. My first attempt was made from black cardstock, which looked all wrong. Then I took some stiff wire intended for earring and jewelry making, along with the foil cap from a wine bottle, and made this:

I assembled the whole thing with CA glue, and wrapped the top and bottom with a thin strip of the wine foil cap, and added a drop of black acrylic paint to the tips of the levers to resemble the rounded ends of the handles. I think that's about as close as I can get to the prototype, given the supplies I had on hand.
Putting clear windows in this beast at HO scale is very difficult indeed; I'm getting quite a bit of squeezeout from the CA glue, but I've decided it's pretty minor, given the scale, and it looks a bit like cobwebs. Cobwebs, yeah, sure, that's the ticket!
I'll probably make the roof removable if I decide I can't see the details through the windows.
Thursday, October 25, 2018
Ceci N'es Pas Une Billboard
I came across this odd billboard on a Portland history blog the other day...


For reference, I used the perspective tool in GIMP to straighten out the photo. I took the frame from a print ad for billboards, and fooled around with fonts to get a fair approximation of the original. (I swiped the colors from that print ad, too.) I altered the circle quite a bit by using different fonts, then rotated it a bit to jazz the design up a little. Once I had everything nailed down the way I wanted it, I used some of my GIMP tricks to make the sign appear to be recently painted on the Clever texture.
After I finished, I zoomed in on a higher resolution version of the original, and realized the original graphic designer put a clock face in the bottom of the 15, with fifteen minutes of the hour highlighted.
By the way, about the lettering for "FURNITURE EXCHANGE"; I just spent about $30 for "Show Biz JNL" by Jeff Levine. I'd been hunting for that font for quite a while, and there's no freebie version of anything close to it. It's a really good approximation of "Bulletin Board Thick and Thin Letters" as seen in The Expert Sign Painter, and variations on this typeface turn up in a lot of signage from that era.


Corner of NE Union (now MLK Blvd) & NE Sacramento Street, 1929.
(Via the Portland Archives and Records Center)
It's got a typical 1920s billboard frame, but that frame is simply painted onto the shiplap on the building. Naturally, I wanted to make one to put on a model building someday, so here's my take on it, dropped onto a Clever Models white shiplap background.

For reference, I used the perspective tool in GIMP to straighten out the photo. I took the frame from a print ad for billboards, and fooled around with fonts to get a fair approximation of the original. (I swiped the colors from that print ad, too.) I altered the circle quite a bit by using different fonts, then rotated it a bit to jazz the design up a little. Once I had everything nailed down the way I wanted it, I used some of my GIMP tricks to make the sign appear to be recently painted on the Clever texture.
After I finished, I zoomed in on a higher resolution version of the original, and realized the original graphic designer put a clock face in the bottom of the 15, with fifteen minutes of the hour highlighted.
By the way, about the lettering for "FURNITURE EXCHANGE"; I just spent about $30 for "Show Biz JNL" by Jeff Levine. I'd been hunting for that font for quite a while, and there's no freebie version of anything close to it. It's a really good approximation of "Bulletin Board Thick and Thin Letters" as seen in The Expert Sign Painter, and variations on this typeface turn up in a lot of signage from that era.

From The Expert Sign Painter, 1922.

Levine's "Show Biz"
UPDATE: Looking closely at more of the pictures on the Vintage Portland blog, I see that these flat billboard frames were a thing... in Portland, at least; I've never run into them before...

Also, while looking for images of workers putting up billboards, I came across a Jam Handy film on Archive.org, To Market, To Market, which was very boring, but had a LOT of information about period billboards.


Also, while looking for images of workers putting up billboards, I came across a Jam Handy film on Archive.org, To Market, To Market, which was very boring, but had a LOT of information about period billboards.

Saturday, March 3, 2018
Flea Circus Update #02 -- Carousel
This is the first of two carousels I've built for my flea circus. There were two things wrong with it: first, the animals are backwards relative to the direction the flags are flying, and second, the needle bearing I made for it is pretty poor and has a little more friction than I wanted. I rebuilt it with the animals corrected and a metal lamp finial as the pivot point for the needle bearing, and it spins quite nicely.
Flea Circus Update #01 -- Strongman Pulls Down a Statue
I'm building a flea circus, updating some of the techniques documented in Walt Noon's excellent DVD tutorial, and I think I've come up with a unique strongman act, inspired by fairly recent events in the news. I'm going to have one of the fleas pull down a statue.
Here's how I see it playing out when I perform: I take out the statue, and explain that he's the former ringmaster of the circus, who was terrible and all the fleas hated him. I'll wave it around a bit, so the audience will get the idea that the statue and the plinth are all one piece. Then I'll place him on the floor of the circus, and loop a bit of rope around his neck, and give the opposite end of the rope to the strongman flea. He'll then begin tugging, and he'll pull the statue off the plinth.
Here's the first prototype...


The base for this is a larger spool, painted with a faux marble finish. The figure is from a "Series of Unfortunate Events" board game, and I thought he looked passably like a circus ringmaster. He's painted with a bronze/copper mix, and given a thin wash of turquoise for the patina. TThe whole setup stands about 4" tall.
I thought about using a Confederate general, but it was more expensive to find just one of those toys than I anticipated. Anyway, the right audience members will understand the implication that this guy represents a Confederate statue.
I've built quite a few components of the circus now, and all that's left is assembly, training the fleas, and building some of the hidden mechanisms to help them do their stunts.
More to follow...
Here's how I see it playing out when I perform: I take out the statue, and explain that he's the former ringmaster of the circus, who was terrible and all the fleas hated him. I'll wave it around a bit, so the audience will get the idea that the statue and the plinth are all one piece. Then I'll place him on the floor of the circus, and loop a bit of rope around his neck, and give the opposite end of the rope to the strongman flea. He'll then begin tugging, and he'll pull the statue off the plinth.
Here's the first prototype...

He's Mr. Green from a Clue set. I've inserted a thumbtack in the base, and hidden a small magnet at the top of the spool. That way, I can hold him upside down, and he'll still stay attached to the plinth. Then I attached a stronger magnet to the bottom of the plinth, so I can set him down on the floor of the circus, and he'll stay put because I've either hidden a metal washer or another magnet under the floor. I'll help the flea tug on the rope with some trickery hidden under the floor.
Once I'd tested to make sure my proof-of-concept miniature worked the way I wanted it to, I built the final statue.


The base for this is a larger spool, painted with a faux marble finish. The figure is from a "Series of Unfortunate Events" board game, and I thought he looked passably like a circus ringmaster. He's painted with a bronze/copper mix, and given a thin wash of turquoise for the patina. TThe whole setup stands about 4" tall.
I thought about using a Confederate general, but it was more expensive to find just one of those toys than I anticipated. Anyway, the right audience members will understand the implication that this guy represents a Confederate statue.
I've built quite a few components of the circus now, and all that's left is assembly, training the fleas, and building some of the hidden mechanisms to help them do their stunts.
More to follow...
Wednesday, October 18, 2017
Fairy Houses
I've started to make Fairy Houses. In a lot of ways, they're more fun than conventional buildings, because I can make up the details as I go along. I don't have to measure a damn thing, and if it's a little wonky, that's a good thing.


I made this from a plastic soda bottle, some air-dry clay, cardboard and acrylic craft paint. I'm using a technique I learned from this YouTube channel: Creative Mom. By starting with a plastic or glass bottle and building on the surface, all you have to do is cut away the clay where you want a window, and HEY-PRESTO! your window is already glazed. After fitting dozens of tiny bits of clear plastic into HO-scale Tichy windows for my last commission, this is much more fun. I can bat one of these out in an enjoyable afternoon, and paint it the following day.
I started on a fairy-house-style train station to go outdoors, and for that, I started using Smooth-On Free-Form Sculpt epoxy clay, as suggested by this YouTuber: Ultimate Papier Mache. Here is the first part I completed: the ticket window.

So far, I've found it a tough medium. The "clay" is very sticky, unless you keep a lot of water on hand, and it doesn't really have clay-like qualities when you're working with it. At times, it was like trying to sculpt with warm taffy. You have to wear latex or nitrile gloves when you use it, which is a drag when you're used to using Sculpey. However, the end result is rock-solid, and I have no doubt it will stand up to harsh weather.
Anyway, I'll keep slogging along with this new-to-me medium, and I'll see if the result sells on Etsy!
Friday, July 7, 2017
Imitation of a Sanborn map.
For no particular reason, I decided to create the footprints of a bunch of Clever Models in the style of an old Sanborn fire insurance map. I might use these to plan a layout someday, or maybe I'm just fooling around.


Tuesday, February 14, 2017
Railcars! Railcars! Railcars!
Man, do I love railcars!
I found these images recently while researching 1920s trucks. They're from a Google Books scan of the trade magazine "Motor Truck: The National Authority on Power Haulage" from 1921.


The roof on this one is really good...

I always call these sorts of things "palindromes," after a kitbashed engine built by Chris Wallas.
 This last one is from another source...

I found these images recently while researching 1920s trucks. They're from a Google Books scan of the trade magazine "Motor Truck: The National Authority on Power Haulage" from 1921.


The roof on this one is really good...


Sunday, September 4, 2016
Replacement for Ertl plastic powerhouse.
A client sent me an HO scale Ertl kit, the Easton Mill. It consists of two plastic buildings, but the sculpt, fit and factory paint-and-weathering on them... let's see, how to say this nicely... it's not up to my standards.

I talked my client into allowing me to build the power house as a cardstock model. I pulled all the dimensions from the Ertl kit and then made it in The Gimp.
Here it is.

I talked my client into allowing me to build the power house as a cardstock model. I pulled all the dimensions from the Ertl kit and then made it in The Gimp.
Here it is.
Stereoscopic View

The main part of the building is inkjet-printed cardstock laminated onto museum board. I used Clever Models textures, as usual. I laminate with the cheapest spray adhesive I can find, which happens to be Aleen's Tacky Spray. (I'll have to do a proper how-to post on this technique when I find the time.)
The most painstaking part of this build: I cut out the doors and windows, then painted the thick edges of the holes with neutral grey acrylic, then I used brown, yellow and grey gouache paints to touch up the edges to match the stones.
I tried a new technique for the steps; I made the bottom tread part of the base of the building. That way, there's no chance of the steps falling off if the structure is handled roughly. Once I had the steps assembled, I treated the edges with cyanoacrylate glue and sanded the edges.

The original model included a boiler out front, and I replicated it with two caps from Trader Joe's disposable pour-over coffee brewers, along with some brass tubing scraps and bits of museum board.
All in all, a quick and fun project.
Friday, July 22, 2016
Clever Models' Papercraft Trailer Shed Freebie
Thom Miecznikowski designed a papercraft model of this oddball structure, and put
it up as a freebie on the Clever Models site. I assume he based it on a
prototype he saw during his travels.

It's only available for a limited time, so JUMP ON IT NOW and maybe send a donation. I sent $5.
Saturday, March 19, 2016
Papercraft Chimneys
I got frustrated trying to saw a notch in some plastic HO scale chimneys, so I decided to make my own.

I started with the working drawings from the Great Northern Historical Society's Modelers' Pages (#392, "Section Houses and Facilities.")

I'd already enlarged the image to use as a template for making walls and roofs, so I just scanned my enlargement at 100% as a starting point. I opened The Gimp, and used one of Clever Models' excellent brick textures to make a simple box with a notch on the bottom. I used that scan of the enlargement to get the size and shape of the chimney correct. I inkjet printed the result on matte photo cardstock, along with a partial sheet of just the brick texture. I cut and assembled the chimneys, adding strips of heavy black cardstock to the interior as I folded, to give it a little thickness. I touched up the edges with gouache paint as I went along. I cut two strips from the brick texture -- one strip was three bricks wide, the other, one brick wide -- and I wrapped them around the chimneys near the top.
The first chimney must have taken about 45 minutes to make, and I messed it up badly and threw it out. By the time I'd made three, they all looked uniformly nice and my time dropped to about 15 minutes for each.
Here is one of the chimneys test-fitted to the roof I completed earlier.

I opted to scratch-build these four models for my client rather than buy and assemble four GNHS kits, since it's actually a savings for him -- cutting the pieces myself and assembling them takes only slightly more time than merely assembling a kit. This also means the money I would have spent on the kits -- which are about $25 each -- goes directly in my pocket. Another advantage to me is: I only charge the client for the time spent on the buildings I make for him, and I track my time very carefully, so as I go along, I can make a fifth model on my own time and at my own expense, and sell it to another client later.

I started with the working drawings from the Great Northern Historical Society's Modelers' Pages (#392, "Section Houses and Facilities.")

I'd already enlarged the image to use as a template for making walls and roofs, so I just scanned my enlargement at 100% as a starting point. I opened The Gimp, and used one of Clever Models' excellent brick textures to make a simple box with a notch on the bottom. I used that scan of the enlargement to get the size and shape of the chimney correct. I inkjet printed the result on matte photo cardstock, along with a partial sheet of just the brick texture. I cut and assembled the chimneys, adding strips of heavy black cardstock to the interior as I folded, to give it a little thickness. I touched up the edges with gouache paint as I went along. I cut two strips from the brick texture -- one strip was three bricks wide, the other, one brick wide -- and I wrapped them around the chimneys near the top.
The first chimney must have taken about 45 minutes to make, and I messed it up badly and threw it out. By the time I'd made three, they all looked uniformly nice and my time dropped to about 15 minutes for each.
Here is one of the chimneys test-fitted to the roof I completed earlier.

I opted to scratch-build these four models for my client rather than buy and assemble four GNHS kits, since it's actually a savings for him -- cutting the pieces myself and assembling them takes only slightly more time than merely assembling a kit. This also means the money I would have spent on the kits -- which are about $25 each -- goes directly in my pocket. Another advantage to me is: I only charge the client for the time spent on the buildings I make for him, and I track my time very carefully, so as I go along, I can make a fifth model on my own time and at my own expense, and sell it to another client later.
Tuesday, March 1, 2016
Hipped Roof Hacks

Working on four section foremen's houses and I'm working out a way to make the hipped roof good and sturdy. This seems to work pretty well: from right to left in the center is the jack rafter, to which I added two right triangles on each side (running up and down in this image). I glued this array to the ceiling piece, then I measured the diagonals from the center to the corners, and cut four more right triangles to fit.
I know I'm saving time in the long haul by making four at once, but it feels really time-consuming.
Tuesday, February 2, 2016


Monday, January 4, 2016
The Statue Got Me High, Part 3
I finished the tiny statue of John Stephens for the Marias Pass section of my client's layout.

Not a perfect match, as you can see when compared side-by-side, but darned close. The prototype coat is shorter, and my collar turned out differently, because I had to wrap it around farther to make it match the figure. My model is about 12' in HO scale, and my guess is the prototype is around 10'.
Here's what the original 1/48th scale figure, from The Model Cellar, looked like on their web page.

He arrived in four pieces: body & legs, arms, and head. Before assembling, I used an X-acto to shave away the upturned collar and diagonal map pocket on the body, as well as the glove he held in his left hand. Then I assembled him with CA glue and shaved away a bit more of the helmet on each side of his head. I made his collar by cutting a small crescent moon shape from the foil you find around the neck of a wine bottle (incredibly handy stuff, that), and attached it with CA glue. I added some small creases to the collar by pressing it with a large sewing needle. I then attached the figure to a small square of styrene, again with CA glue.
To change his headgear from a leather helmet with a brim, I took a very thin strip of blue paper shop towel, soaked it in CA glue and wrapped it around his head. The porous surface looks a lot like sheepskin when you view it with a magnifier.
The primer coat came from a $1 rattle can of matte black. Then I brushed on two coats of thinned green/bronze acrylic mix, waited for that to dry, and then I applied the very thin turquoise patina coat. As you can see in earlier posts, I did a fair amount of experimentation to get that color mix.
The base is made of several slabs of chipboard soaked in CA glue. I simulated the pink granite (?) base with pale magenta acrylic splattered with darker magenta and off-white, with a final grimy wash of India ink thinned with isopropol alcohol to grunge it up a little.
Total assembly and painting time was just a couple hours... as long as you don't count all the time I spent thinking about how to do it over the last few months.
By the way, in case you wondered why I gave these posts such an odd title...
And here's another song about a statue that ran through my head as I worked on this...

Not a perfect match, as you can see when compared side-by-side, but darned close. The prototype coat is shorter, and my collar turned out differently, because I had to wrap it around farther to make it match the figure. My model is about 12' in HO scale, and my guess is the prototype is around 10'.
Here's what the original 1/48th scale figure, from The Model Cellar, looked like on their web page.

He arrived in four pieces: body & legs, arms, and head. Before assembling, I used an X-acto to shave away the upturned collar and diagonal map pocket on the body, as well as the glove he held in his left hand. Then I assembled him with CA glue and shaved away a bit more of the helmet on each side of his head. I made his collar by cutting a small crescent moon shape from the foil you find around the neck of a wine bottle (incredibly handy stuff, that), and attached it with CA glue. I added some small creases to the collar by pressing it with a large sewing needle. I then attached the figure to a small square of styrene, again with CA glue.
To change his headgear from a leather helmet with a brim, I took a very thin strip of blue paper shop towel, soaked it in CA glue and wrapped it around his head. The porous surface looks a lot like sheepskin when you view it with a magnifier.
The primer coat came from a $1 rattle can of matte black. Then I brushed on two coats of thinned green/bronze acrylic mix, waited for that to dry, and then I applied the very thin turquoise patina coat. As you can see in earlier posts, I did a fair amount of experimentation to get that color mix.
The base is made of several slabs of chipboard soaked in CA glue. I simulated the pink granite (?) base with pale magenta acrylic splattered with darker magenta and off-white, with a final grimy wash of India ink thinned with isopropol alcohol to grunge it up a little.
Total assembly and painting time was just a couple hours... as long as you don't count all the time I spent thinking about how to do it over the last few months.
By the way, in case you wondered why I gave these posts such an odd title...
And here's another song about a statue that ran through my head as I worked on this...
Friday, December 25, 2015
The Statue Got Me High, Part 2
I think I have the colors just right now...


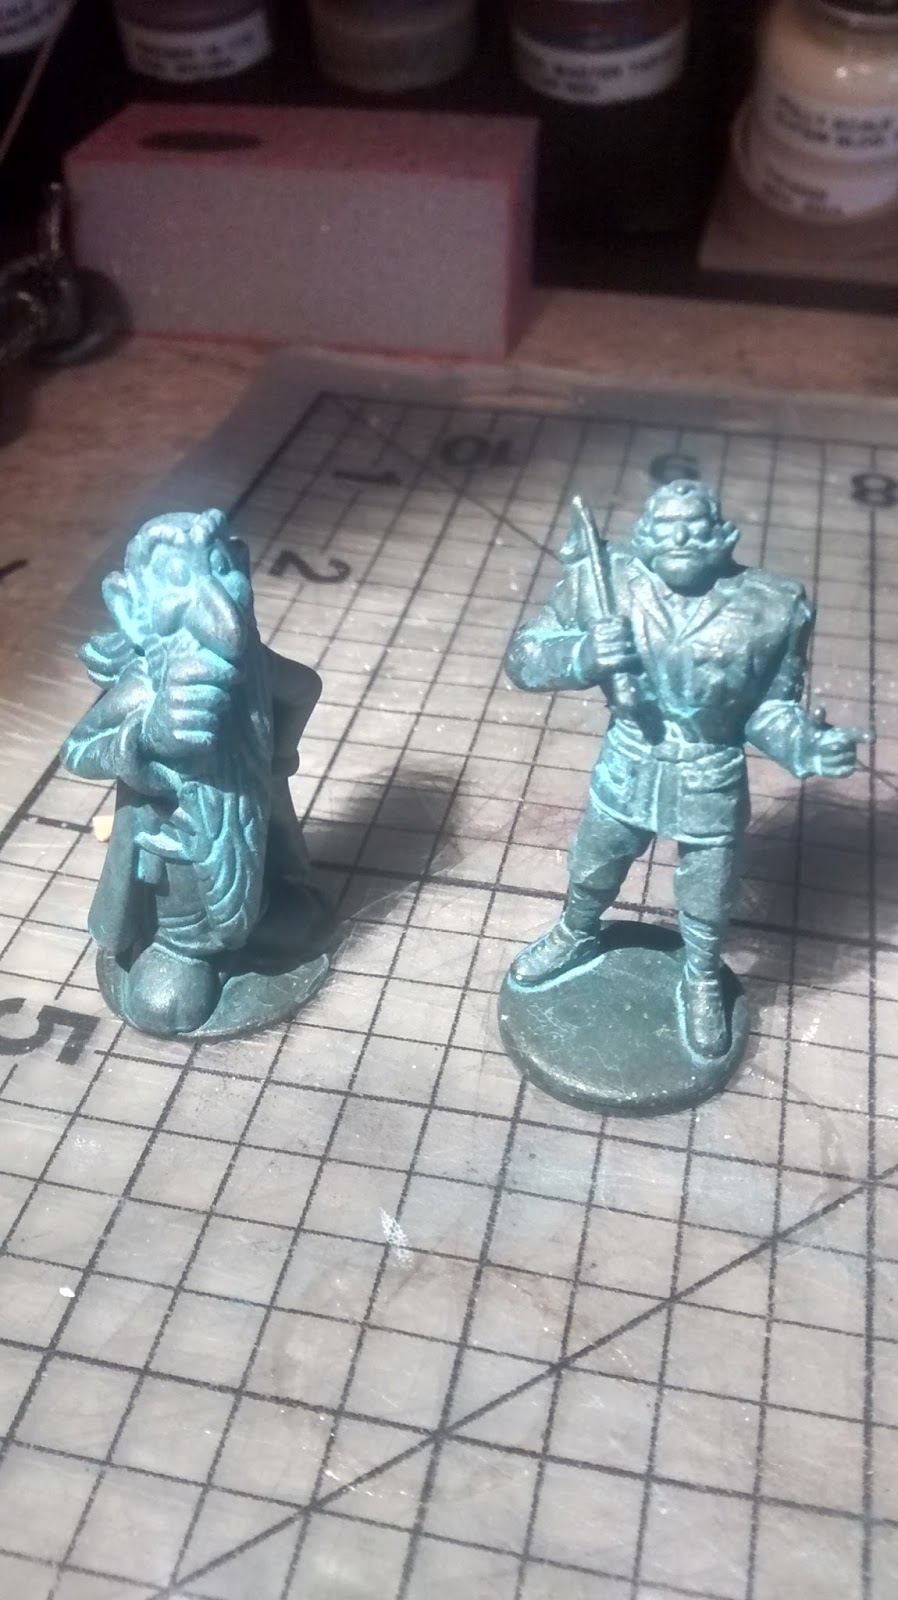

The figures: A Kinder Surprise toy of Getafix (from the Asterix comic books) and two Clue Master Detective figurines, Colonel Mustard and Prince Azure.I really like how Getafix turned out. He looks like something from Discworld.
The base: bits of chipboard, painted pink-ish to simulate the stone base of the statue I'm replicating for my client.
Primer coat: cheap rattle-can black from Home Depot.
Base coat: FolkArt Sap Green, mixed with a bit of DecoArt Rich Espresso metallic and a few drops of black craft paint. Thinned with a little Windsor & Newton Flow Improver.
Patina: DecoArt Desert Turquoise, thinned with a little flow improver and a lot of distilled water. (I tried using alcohol, as per a couple online instructions, but I ended up with the alcohol fusing with the pigment and making a horrible phlegmy blob in the bottom of the bottle.) I gave the statues two coats of patina, making sure a lot of it settled into the folds and crevices of the figures.
Subscribe to:
Posts (Atom)