Monday, January 4, 2016

The Statue Got Me High, Part 3

I finished the tiny statue of John Stephens for the Marias Pass section of my client's layout.


Not a perfect match, as you can see when compared side-by-side, but darned close. The prototype coat is shorter, and my collar turned out differently, because I had to wrap it around farther to make it match the figure. My model is about 12' in HO scale, and my guess is the prototype is around 10'.

Here's what the original 1/48th scale figure, from The Model Cellar, looked like on their web page.


He arrived in four pieces: body & legs, arms, and head. Before assembling, I used an X-acto to shave away the upturned collar and diagonal map pocket on the body, as well as the glove he held in his left hand. Then I assembled him with CA glue and shaved away a bit more of the helmet on each side of his head. I made his collar by cutting a small crescent moon shape from the foil you find around the neck of a wine bottle (incredibly handy stuff, that), and attached it with CA glue. I added some small creases to the collar by pressing it with a large sewing needle. I then attached the figure to a small square of styrene, again with CA glue.

To change his headgear from a leather helmet with a brim, I took a very thin strip of blue paper shop towel, soaked it in CA glue and wrapped it around his head. The porous surface looks a lot like sheepskin when you view it with a magnifier.

The primer coat came from a $1 rattle can of matte black. Then I brushed on two coats of thinned green/bronze acrylic mix, waited for that to dry, and then I applied the very thin turquoise patina coat. As you can see in earlier posts, I did a fair amount of experimentation to get that color mix.

The base is made of several slabs of chipboard soaked in CA glue. I simulated the pink granite (?) base with pale magenta acrylic splattered with darker magenta and off-white, with a final grimy wash of India ink thinned with isopropol alcohol to grunge it up a little.

Total assembly and painting time was just a couple hours... as long as you don't count all the time I spent thinking about how to do it over the last few months.

By the way, in case you wondered why I gave these posts such an odd title...


And here's another song about a statue that ran through my head as I worked on this...


Friday, December 25, 2015

The Statue Got Me High, Part 2

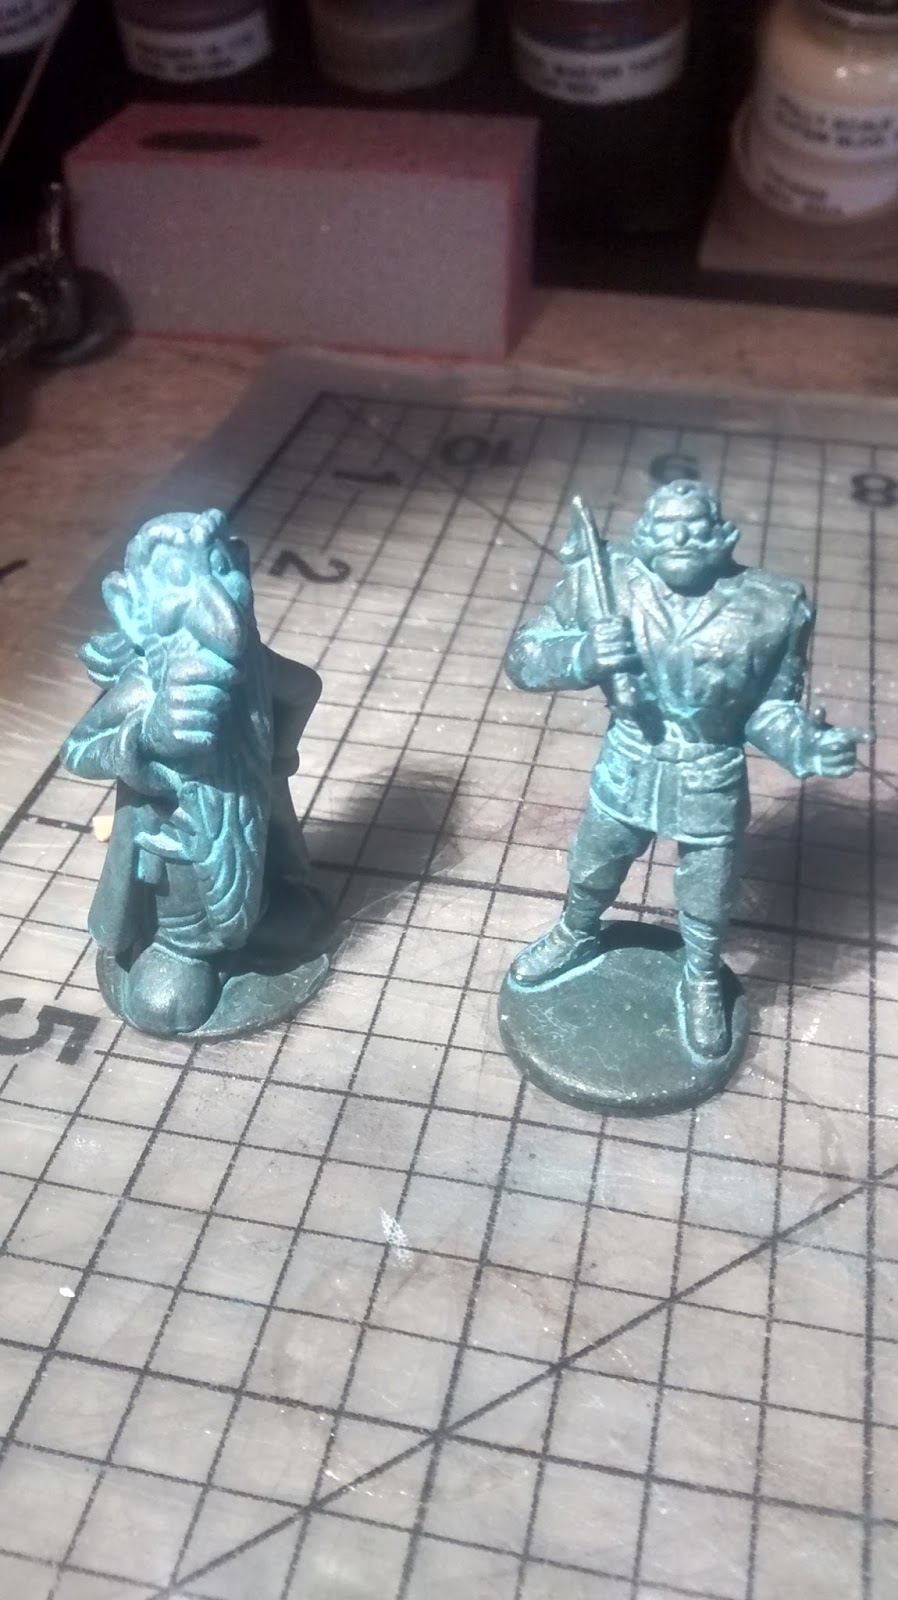
I think I have the colors just right now...


The figures: A Kinder Surprise toy of Getafix (from the Asterix comic books) and two Clue Master Detective figurines, Colonel Mustard and Prince Azure.
The base: bits of chipboard, painted pink-ish to simulate the stone base of the statue I'm replicating for my client.

Primer coat: cheap rattle-can black from Home Depot.

Base coat: FolkArt Sap Green, mixed with a bit of DecoArt Rich Espresso metallic and a few drops of black craft paint. Thinned with a little Windsor & Newton Flow Improver.

Patina: DecoArt Desert Turquoise, thinned with a little flow improver and a lot of distilled water. (I tried using alcohol, as per a couple online instructions, but I ended up with the alcohol fusing with the pigment and making a horrible phlegmy blob in the bottom of the bottle.) I gave the statues two coats of patina, making sure a lot of it settled into the folds and crevices of the figures.
 I really like how Getafix turned out. He looks like something from Discworld.

Tuesday, December 22, 2015

The Statue Got Me High

Well, not really. But I have been thinking about how to make a statue for a client's layout for a while, and today I tested some paints, and I think I've got it.

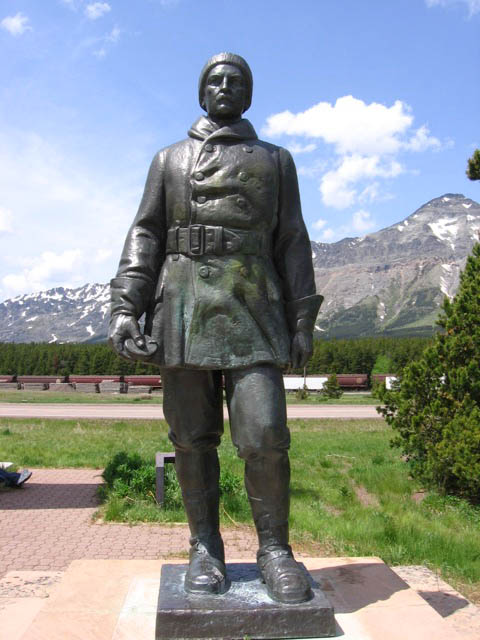
Here is the statue the client needs:


It's John Stevens, the man who surveyed the route that eventually became part of the Great Northern Railroad line.

My client's layout is HO scale, so my thinking was, I can use an O scale figure, and it would be "larger-than-life" compared to an HO scale figure... just about the right size of 10 HO scale feet tall. If you compare the size of the pointing fellow to the size of Stevens, the ratio sure looks to me like HO to O.

The question was, what figure to use? I searched everywhere for mountain men, fur trappers, hunters, native Americans... anything that might come close to replicating that outfit, but I came up with nothing that was going to work.

Then one day, I got a bright idea. What about fighter pilots?

Here's a different view of  the sculpture...


...and get a load of this WWI British pilot! He's in practically the same pose!


I'll have to modify or replace his head, but otherwise, it's a really good match, and it's 1/48th scale, which is standard USA O scale. Even though we won't be building that part of the layout for months, I ordered him today, since cottage companies like The Model Cellar tend to go under with no notice. 

Anyway, today I got a bee in my bonnet about testing out some painting and weathering techniques for this statue, and so I went to the craft store to pick up some cheap bronze and turquoise paint. Then I went home and dug around in my gaming box for some board game figurines I've used as tokens for Cheapass Games. I grabbed a Homies figurine of a mariachi violin player, sprayed him matte black with a rattle can, gave him two coats of bronze and a wash of thinned turquoise, and came up with this.

The base is three squares of chipboard, toughened up with a bit of super glue, painted with two shades of Badger concrete and weathered with india ink in isopropyl alchohol. I think for the final model, I'll darken that bronze paint with quite a lot of dark green, but apart from that, I think I've got it.

Sunday, October 25, 2015

Gorre & Daphetid diorama in N Scale, Pt 1

I just started working on a diorama based on the Cross Junction / Corsa area of John Allen's Gorre & Daphetid railroad. I bought the plans from Silver Ridge Modelworks. It's available as either an HO-scale laser-cut kit, or you can just purchase the instructions and the templates, and build it yourself from scratch in whatever scale you want. My plan is to take the templates and apply Clever Models textures with The GIMP to make an N scale version of the depot, and install it in a diorama which is similar to the original G&D scene.

Here is the diorama suggested by Silver Ridge...


...and here is how the station looked in the original G&D setting.


You can see that Allen had a tunnel perpendicular and under the upper track. I decided to put that in.

I threw together a quick, corrugated and chipboard dummy in three dimensions to see what the proportions might look like. This gives me some planning flexibility, because I can move the station around, and I'll have an idea what works and what doesn't.

This is what it looked like after a couple hours.


I converted the measurements for the diorama down to N from the Silver Ridge plans, but when I got to the station, I used no measurements at all -- I just hacked away at the chipboard and slathered the edges with Aleene's Tacky Glue. If someting was too big, I chopped it off. If it was too small, I tore it off and made a bigger piece. It's a bit like sketching with a pencil and erasing whatever looks wrong. It's a lot of fun, and the whole process only took a couple hours. Possibly 90 minutes. I'm having trouble estimating the time spent, because I was "in the zone" the whole time.

The following evening, I threw together a very rough cityscape, similar to the G&D original, but a little more urban. I'll use forced perspective to fit that skyline in the very limited space, and the buildings in the front may need to be a little smaller than N scale.


Overhead shot.

I can already see I'll have to lower the skyline about 1/2 to 3/4 of an inch, because I don't like the proportions. Also, I'll modify that cross street so the back of it is hidden a bit better.

The upper deck of this should have a streetcar, while the lower station will provide passenger and freight service.

Wednesday, October 21, 2015

Happy BTTF Day!

Here are a few random thoughts about my favorite joke in the Back to the Future series, the scene where Doc Brown apologizes for the crudity of his incredibly elaborate model of Hill Valley's town square, which he apparently just threw together really quickly, using lunch pails, salt shakers, ketchup bottles, egg cartons, etc.

"I didn't have time to build it to scale or paint it.

The joke works for me on multiple levels.

As a scale structure builder, I know how much effort went into that tabletop model. It probably took several prop builders a couple days to put that damn thing together.

It's a joke about the selective compression of, you know, TIME in movies. Because we don't actually see Doc working on the model, we just think, "Some time passed while he built that model." But the model is really too complex for the unshown time, which tickles me.

Marty is a little stunned by how detailed the model is, and how nuts Doc would have to be to think it isn't good enough. Because he likes Doc, and wants to reassure him it's okay, there's a little nice relationship interplay in the exchange...

Doc: "Let me show you my plan for sending you home. Please excuse the crudity of this model. I didn't have time to build it to scale or paint it."

Marty: "It's good."

Doc: "Oh, thank you. Thank you."

Doc actually did paint everything off-white, which would be even more time-consuming than just gathering all the elements and setting them on the ping-pong table. In true boffin style, Doc thinks his explanation would be clearer if he added much, much more detail. But if the prop makers hadn't painted everything one color, the image would have been too cluttered, and the wind up car and wristwatch wouldn't have popped against the neutral background.

It's great foreshadowing. Doc builds a model to demonstrate how every little detail has to be just perfect, and the wind-up car catches fire and flies off the table. This creates a nice bit of suspense later, because if Doc couldn't even get a demonstration to work...

In BTTF III, it's a nice callback to the first movie. Because events repeat themselves in the films, Marty knows the drill by now...

Doc: "Marty, once more let's go over the entire plan and layout. I apologize for the crudity of this model, but I just..."

Marty: "Yeah, I know, Doc, it’s not to scale. It’s okay, Doc."

Doc: "Alright."


I love the plausibly (and improbability) of Doc quickly making these made from 1885 items. Doc is a blacksmith, so it makes some sense he'd fabricate a miniature Delorean from sheet tin and bullet casings. Since 1885 pre-dates model railroading, he has to build the train out of whatever is at hand -- part of a corncob pipe, spools, revolver parts. Again, notice how nicely these props read -- the bodies are all dark brown/black parts, while the details are lighter-colored wooden parts. "TIME MACHINE" is written in white, so Clara can't possibly miss it when she comes upon the scene.

I realize there is no "I-apologize-for-the-crudity-of-this-model" scene in BTTF II, the very film we're celebrating today. BTTF II is my least favorite of the three movies, as it's a confusing mess. The lack of a model of Hill Valley in BTTF II might even contribute a little to my disliking it.

As long as I'm ranting about BTTF, My theory about the trilogy is: the construction is musical -- BTTF I is the presentation of the theme; BTTF II is a fugue with variations on the theme; and BTTF III is the pastoral. 


Sunday, September 6, 2015

Build Your Own Working Clock Out of Paper


I'm trying to finish this kit I set aside years ago for the PDX Mini Maker Fair next weekend. I like to challenge myself and have a new showpiece or two every year.