An ongoing diary of miniatures I've built, as well as links to inspiring scale models.
Tuesday, December 23, 2014
Saturday, December 20, 2014
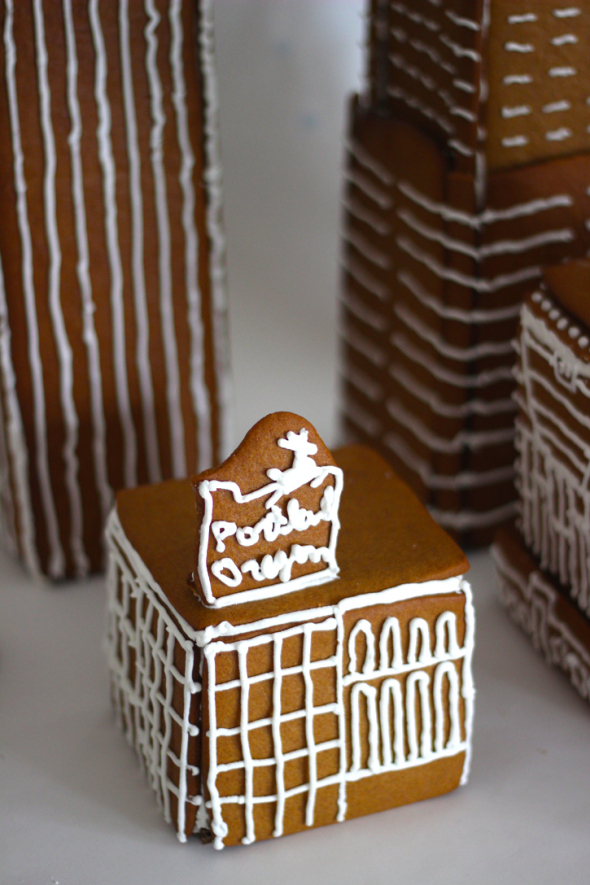
Paper Creek Randsburg Barbershop
Free download from George Taylor, owner of the now-defunct Paper Creek Models. He's looking into releasing his older, formerly laser-cut models to the internet, and this is a first step in that direction.

Info here. (Registration with PaperModlers.com required.)
Info here. (Registration with PaperModlers.com required.)
Friday, December 19, 2014
Modern Railcar
Contractors are working on the tracks for the new light rail line right near my apartment complex. Pushed my flip phone through the chain link fence and got these shots of the railtruck.


Tuesday, December 16, 2014
My Workshop in a Cigar Box
I'm getting ready to go on a holiday trip, so I'm getting all my model building tools ready to take along with me. I decided to pack everything I like to use into a small cigar box, just for the sake of living up to the old Micromodels' slogan: "Your Workshop in a Cigar Box."
Here's the box in question. I think I paid $2 for this at a nearby cigar shop.

Here it is opened and stuffed with tools. That thing on the top is a plastic tile with a magnet on top of it, and a fridge magnet stuck to that. Good for pressing small pieces together for laminating.

My self-healing cutting mat. It's a bit odd, I think because it's a promotional item and it's supposed to be a miniature of a larger mat: the markings are in millimeters and inches, but they're far smaller than the actual units of measurement.
My hobby knife handle. I've already sent myself a stamped, self-addressed envelope with all my #11 blades, so the TSA has no excuse to take my fun away.
The goofy eraser on the end is a Japanese thing: an unhappy tooth with a cavity. I use it here because it's roughly square, so the knife won't roll of the table and stab me in the thigh (or worse).

Two tiny sharpening tools. On the right is a ceramic rod sharpening widget. It was originally about 2" x 2", but I used my Dremel to cut away everything it didn't need to do its job. I've found I can extend the life of a #11 blade by about five or six times, just by whisking it a few times through this and then stropping the burrs off with the piece of leather on the left. I've heard tell of hobbyists who carefully sharpen the same blade for years and years... and that's a lot more than I'm willing to do.

A 6" General Tools steel ruler. This one is good, but it's not my favorite. I mailed my favorite (a vintage, nickle-plated promotional ruler from a metal supply company) forward in the SASE, just in case someone at the TSA says a stupid person might confuse it with a knife blade. Fine. Whatever. They can take away my not-favorite ruler.

Three different glues. The top is an Aleene's Tacky Glue pen. In the middle is a modified water brush (more on these later) filled with thinner PVA bookbinding glue. On the bottom is a glue stick, for laminating pieces.

A triangle. Pretty good for getting right angles.

A small roll of drafting dots. They're just little dots of masking tape.

An Altoids Smalls tin, containing...

...a tiny watercolor/gouache set for edging the cardstock. The most used colors in here are the neutral greys. Watercolors work well for me because I can mix the colors I need in advance, let them dry, and all it takes to get them working is a drop of water.
This watercolor set is easy to make -- I just put a layer of white Sculpey along the bottom, pressed the bottom of a large X-Acto handle into it to make indentations, baked it, and filled the indentations with gouache.
The little green globs are poster putty. It's sometimes useful for test-fitting parts.

The Pentel water brush. This is the best tool for coloring the edges of paper models I know of. I've used watercolors for this task for years, and this brush makes it a cinch. The body of the brush holds water, which you squeeze through the bristles. Very useful if you change colors a lot, because you can clean the brush easily -- just squeeze into a napkin or tissue and rub a few times.

A couple pencil stubs. Stubs because they fit in the box; Palomino Blackwings because they write nicely.

The uncut models are in this cardboard box.

They're printed on matte photo cardstock, chopped down to postcard size, and I've already sprayed them with matte fixative, so they're all ready to go.

I've got a hotel and a small machine shop from Clever Models. (By the way, they're running a Buy-One-Get-One-Free sale until 12/24/14. That's how I bought these.) I reduced the O scale models down to N scale. At that reduction, two pages of the original model fit on the postcard-sized paper. I've also printed the windows on transparency film, and sprayed that with fixative to make them a little opaque.

I use this nice antique box to hold completed tiny pieces.

I've already cut some discs to use to shape the machine shop's water tank.
Here's the box in question. I think I paid $2 for this at a nearby cigar shop.
Here it is opened and stuffed with tools. That thing on the top is a plastic tile with a magnet on top of it, and a fridge magnet stuck to that. Good for pressing small pieces together for laminating.
My self-healing cutting mat. It's a bit odd, I think because it's a promotional item and it's supposed to be a miniature of a larger mat: the markings are in millimeters and inches, but they're far smaller than the actual units of measurement.

My hobby knife handle. I've already sent myself a stamped, self-addressed envelope with all my #11 blades, so the TSA has no excuse to take my fun away.
The goofy eraser on the end is a Japanese thing: an unhappy tooth with a cavity. I use it here because it's roughly square, so the knife won't roll of the table and stab me in the thigh (or worse).
Two tiny sharpening tools. On the right is a ceramic rod sharpening widget. It was originally about 2" x 2", but I used my Dremel to cut away everything it didn't need to do its job. I've found I can extend the life of a #11 blade by about five or six times, just by whisking it a few times through this and then stropping the burrs off with the piece of leather on the left. I've heard tell of hobbyists who carefully sharpen the same blade for years and years... and that's a lot more than I'm willing to do.
A 6" General Tools steel ruler. This one is good, but it's not my favorite. I mailed my favorite (a vintage, nickle-plated promotional ruler from a metal supply company) forward in the SASE, just in case someone at the TSA says a stupid person might confuse it with a knife blade. Fine. Whatever. They can take away my not-favorite ruler.
Three different glues. The top is an Aleene's Tacky Glue pen. In the middle is a modified water brush (more on these later) filled with thinner PVA bookbinding glue. On the bottom is a glue stick, for laminating pieces.
A triangle. Pretty good for getting right angles.
A small roll of drafting dots. They're just little dots of masking tape.
An Altoids Smalls tin, containing...
...a tiny watercolor/gouache set for edging the cardstock. The most used colors in here are the neutral greys. Watercolors work well for me because I can mix the colors I need in advance, let them dry, and all it takes to get them working is a drop of water.
This watercolor set is easy to make -- I just put a layer of white Sculpey along the bottom, pressed the bottom of a large X-Acto handle into it to make indentations, baked it, and filled the indentations with gouache.
The little green globs are poster putty. It's sometimes useful for test-fitting parts.
The Pentel water brush. This is the best tool for coloring the edges of paper models I know of. I've used watercolors for this task for years, and this brush makes it a cinch. The body of the brush holds water, which you squeeze through the bristles. Very useful if you change colors a lot, because you can clean the brush easily -- just squeeze into a napkin or tissue and rub a few times.
A couple pencil stubs. Stubs because they fit in the box; Palomino Blackwings because they write nicely.
The uncut models are in this cardboard box.
They're printed on matte photo cardstock, chopped down to postcard size, and I've already sprayed them with matte fixative, so they're all ready to go.
I've got a hotel and a small machine shop from Clever Models. (By the way, they're running a Buy-One-Get-One-Free sale until 12/24/14. That's how I bought these.) I reduced the O scale models down to N scale. At that reduction, two pages of the original model fit on the postcard-sized paper. I've also printed the windows on transparency film, and sprayed that with fixative to make them a little opaque.
I use this nice antique box to hold completed tiny pieces.
I've already cut some discs to use to shape the machine shop's water tank.

Saturday, December 13, 2014
Paperholm
This gentleman in Scotland makes one papercraft architectural model per day, and each is simple, beautiful and unique.
Sunday, December 7, 2014
Spot the differences Between the HO and N Scale Gorre Water Towers
A quick stereoscopic comparison of the HO and N scale Gorre water towers from Clever Models. You can see there are a few details on the HO model that I left out on the smaller version.
Penny shown for scale.

Penny shown for scale.
Friday, December 5, 2014
N Scale Gorre Water Tower
I didn't change very much to modify this from the HO orginal. I skipped the turnbuckles and simplified the brick trim, made the hatch on top closed instead of open, used waxed thread instead of chain, and that's about it.
It was actually a little easier than I thought it would be. I used a painted toothpick with a blob of Sculpey as the spire on top. Another toothpick worked very nicely to keep each of the support pieces under the tank properly spaced. About the trickiest part was the bands around the tank.
Blurry shot, but it's just for size reference. I'll try to take some better shots this weekend.

Subscribe to:
Posts (Atom)